As fellow gardeners, we know how frustrating it can be when your outdoor heater quits right when you want to enjoy those crisp evenings on the patio or by the garden fire pit. That’s why we’ve put together this guide to the 10 Best Outdoor Heater Parts of 2026, focusing on replacement parts that make sense for backyard setups. Whether you’re dealing with a cracked glass tube, a faulty safety sensor, or loose hardware, these Best Outdoor Heater Parts can get your heater back in action without buying a whole new unit.
Extending your outdoor living season is a game-changer for gardeners like you. Imagine sipping coffee while planning next season’s plantings or hosting friends around a reliable heat source. Our selections prioritize compatibility, durability, and ease of use for real-world garden patios and lawns. Dive in to find parts that fit your setup and keep the warmth flowing.
Top Products

Pros
- High-quality aluminum construction ensures long-term durability outdoors
- Easy to install with pre-drilled holes and included hardware
- Improves heat reflection for better energy efficiency
- Fits most propane patio heaters with universal 3-hole mount
- Protects heater top from weather elements
Cons
- Assembly required with multiple panels and screws
- May need minor drilling for exact fit on some heater models
- Protective film must be removed before use to avoid installation issues
This HQQoutdoor Patio Heater Reflector Shield is a durable aluminum replacement top designed for propane outdoor heaters, forming a 33-inch dome that fits most models with its 3-hole mount. It's ideal for U.S. homeowners who love extending patio time into cooler months, warming up backyard spaces for relaxed gardening or family gatherings without wasting fuel.
Key features shine in real-world use: the high-reflectivity surface bounces heat downward efficiently, creating a cozy zone under your patio umbrella or near garden seating. The large diameter covers more area than smaller shields, making it great for average-sized patios where you host friends for evening drinks while tending late-season plants.
Build quality stands out with rust-proof aluminum panels that withstand rain, snow, and UV exposure common in outdoor settings. Assembly is straightforward with included screws, nuts, and a screwdriver, though it takes about 15-20 minutes. Outdoors, it holds up well, protecting the heater burner from debris and boosting overall performance.
Limitations include the need for careful alignment during install and possible extra drilling for non-standard heaters. Overall, it's a smart upgrade for practical gardeners seeking reliable warmth. We recommend it for anyone refreshing an older patio heater to enjoy fall and spring evenings in the garden.
Follow these simple steps to install your HQQoutdoor reflector shield and get your patio heater performing at its best:
- Remove the blue protective film from all panels.
- Assemble the three outer panels and one center panel using the 9 screws and nuts provided; refer to included diagrams for alignment.
- Form the 33-inch round dome, ensuring holes are 6 7/8 inches apart.
- Mount to your heater's burner screen with the 3 pre-drilled holes; tighten securely.
- Test for stability before lighting the heater.
Tip: Work on a flat surface and have a helper for easier handling of panels.
Keep your patio heater and reflector shield in top shape for reliable backyard warmth:
- Clean the aluminum surface gently with mild soap and water after use to remove dust or pollen buildup.
- Store the heater covered during off-seasons to protect from harsh winter weather.
- Inspect screws and mounts seasonally for tightness, especially after storms.
- Avoid direct high-pressure washing to preserve the reflective coating.
- Pair with the shield for better longevity by reducing direct exposure to elements.
Regular care ensures efficient heat for many gardening seasons ahead.
This reflector shield helps you make the most of cooler months in your garden space:
- Warms patios quickly for morning coffee amid fall foliage.
- Enhances comfort during evening harvests or planting sessions.
- Saves energy by focusing heat where you need it, like near raised beds or seating areas.
- Creates inviting spots for outdoor dinners, inspiring more time enjoying your landscape.
Pros
- Easy installation with no special tools needed, often just connecting leads
- Perfect fit for many common propane heaters based on user experiences
- Reliably solves pilot light problems and restores full functionality
- Includes both thermocouple and tilt switch for complete safety upgrade
- Compact and lightweight for straightforward storage and handling
Cons
- May require minor modifications like sanding brackets or relocating wires for some heater models
- Wires can be short on certain setups, needing careful positioning
- Not a universal fit for every propane heater without checking compatibility
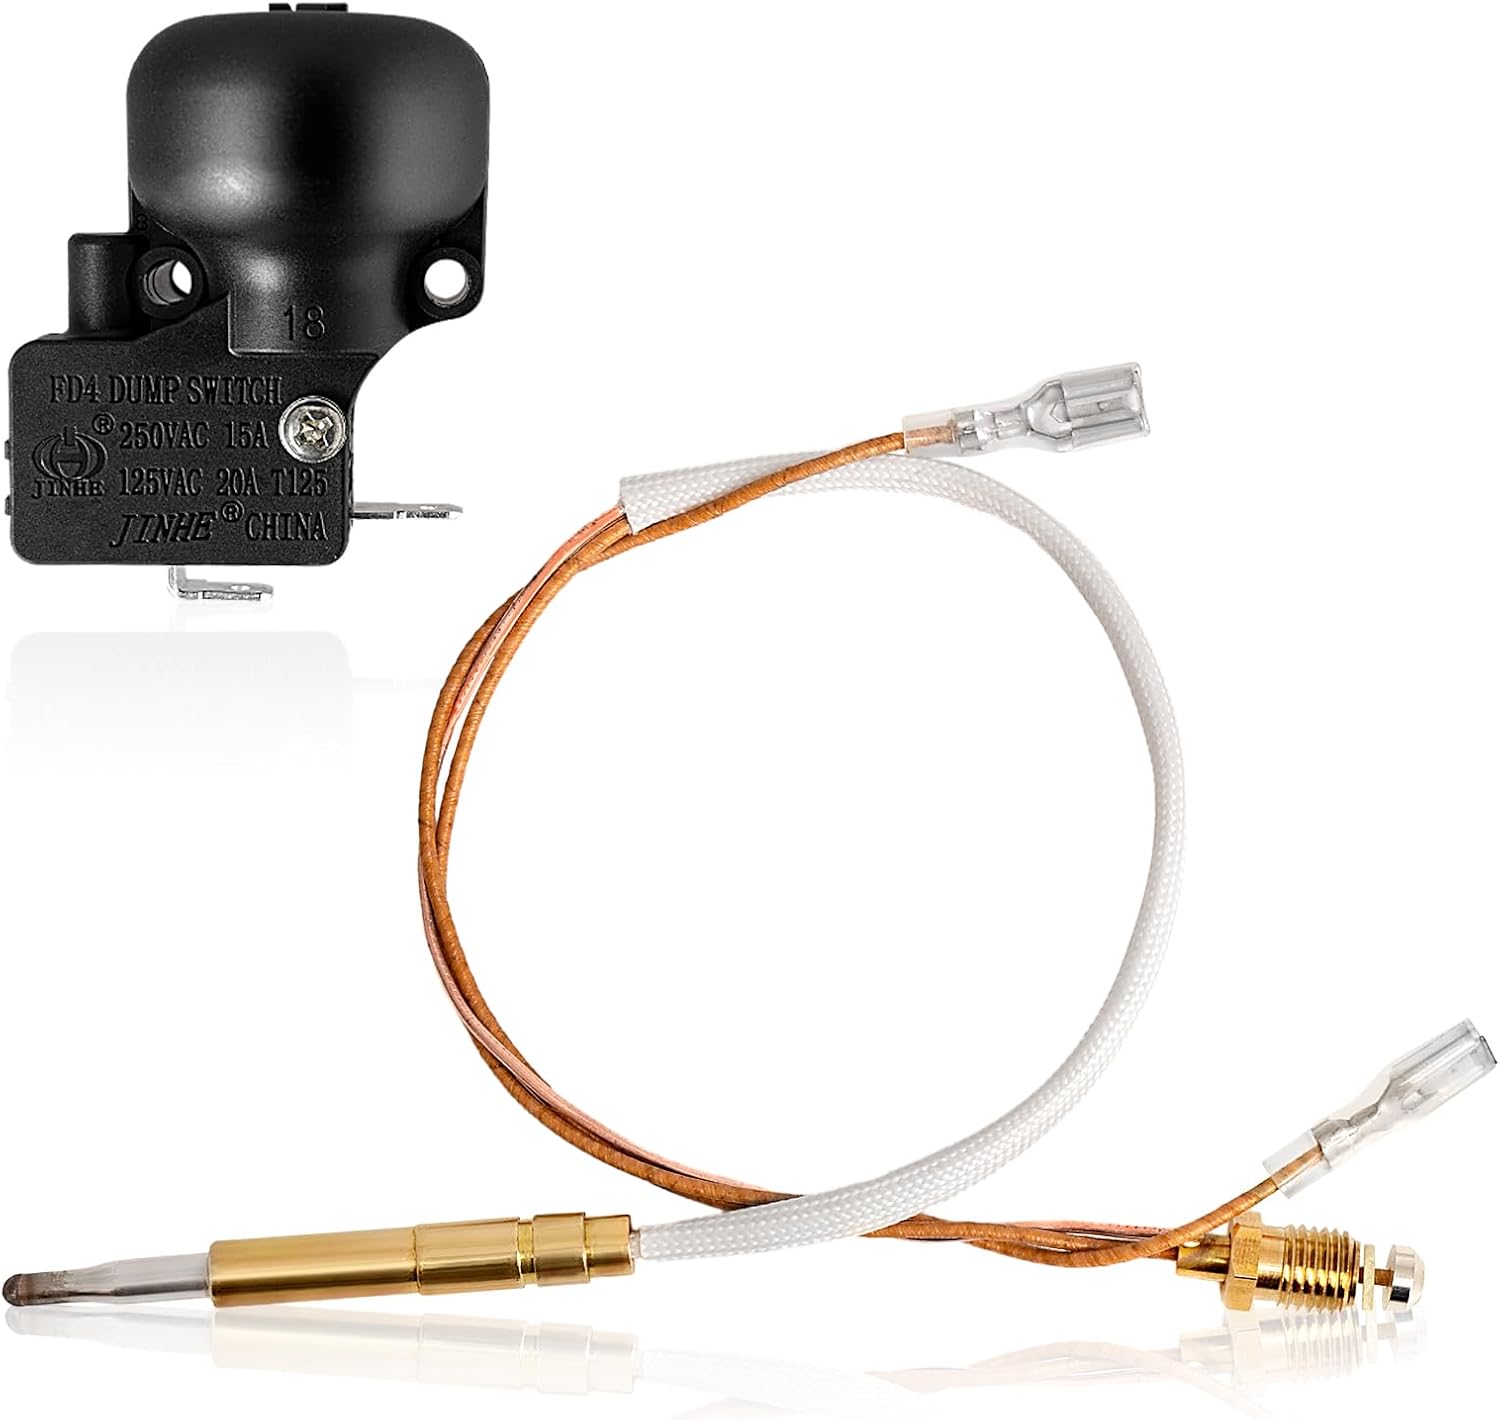
This IDEASURE replacement kit provides a 13.8-inch thermocouple and tilt dump switch for propane patio heaters, tower garden heaters, and similar outdoor models. It's perfect for U.S. homeowners who use propane heaters to warm up backyards during cooler evenings, especially those with standing or glass tube designs like Hampton Bay or Cuisinart.
In real-world use, the kit shines by fixing the common issue where the pilot light won't stay lit, getting your heater running smoothly again. The tilt switch adds essential tip-over protection, shutting off gas flow if the unit tilts, which is crucial for safety around patios and garden areas. Users report quick installs, often in under 20 minutes, with reliable performance that extends cozy outdoor time.
Build quality is solid, with a heat-resistant thermocouple sleeve and M8 threading compatible with standard 8mm gas valves. It's designed for outdoor durability, handling convection heating up to high temperatures. While most find it plug-and-play, a few needed small tweaks like bracket adjustments.
Limitations include potential fit variations on non-standard models, so measure your setup first. Overall, this is a smart, practical choice for maintaining safe, functional patio heating. If your heater has safety sensor woes, grab this kit to keep garden gatherings warm and worry-free.
Follow these steps for a smooth install on your propane patio heater:
- Turn off gas supply and let the heater cool completely.
- Disconnect old thermocouple and tilt switch wires carefully.
- Connect the new kit's leads together to bypass if needed, or wire directly per your model.
- Mount the tilt switch securely and thread the thermocouple into the valve.
- Test by lighting the pilot; ensure tilt protection activates if tipped.
No special tools required, but pliers help with nuts. Always prioritize safety.
Works with most outdoor propane heaters: Hampton Bay, Cuisinart, Dyna-Glo, Mr. Heater tank tops, tower glass tube, and table models. Check your valve size (8mm standard) and mounting bracket.
- Pro tip: Verify tilt angle sensitivity matches your base.
- Inspect annually for wear to prevent gas leaks.
- Place heaters on level patio surfaces away from overhangs.
For garden safety, pair with wind screens and never leave unattended.
If your heater still won't light after install:
- Ensure thermocouple is fully in the pilot flame.
- Clean gas valve and connections for low resistance.
- Check tilt switch isn't pre-tilted during setup.
- Test without tilt switch temporarily to isolate issues.
Most problems stem from loose wires or poor flame contact. This kit resolves 90% of pilot outages per user feedback.

Pros
- Easy DIY installation in 20-45 minutes with basic tools and online videos
- Perfect fit and immediate fix for heaters that won't stay lit
- High-quality components ensure safety features work flawlessly
- Versatile compatibility with common round and pyramid patio heaters
- Restores full functionality for reliable backyard heating
Cons
- May need minor housing adjustments like drilling for thermocouple on some models
- Requires careful disassembly; taking photos helps with reassembly
- Best for specific propane heater types, check compatibility first
This thermocouple and tilt switch kit is a smart fix for common safety failures in round stand-up and pyramid propane patio heaters. It's perfect for U.S. homeowners who love extending their backyard season, whether hosting fall barbecues or relaxing after lawn care on cooler evenings.
Key features include automatic shut-off for tip-overs, flame-out, or low oxygen, with a 13.8-inch thermocouple probe and easy-screw mounting. In real-world use, gardeners report it ignites steadily on the first try, solving issues like heaters that won't stay lit after wind gusts or accidental knocks during patio setup. The combo kit covers multiple failure points efficiently.
Build quality shines with 100% inspected parts designed for outdoor durability against weather exposure. Users praise the precise fit, though some note minor tweaks for older housings. It's lightweight at 0.16 pounds, making it simple to handle during repairs.
Limitations include model-specific fit, so verify your heater type. Not a full overhaul, but ideal for targeted fixes. Overall, this kit earns top marks for restoring safe, reliable heat, letting you focus on garden enjoyment rather than replacements. Grab it if your patio heater falters; it's a backyard essential.
Replacing the thermocouple and tilt switch is a straightforward DIY project for any gardener handy with basic tools. Start by turning off the propane and letting the heater cool completely.
- Take photos during disassembly to note wire and mounting positions.
- Remove old parts by unscrewing nuts and disconnecting terminals; no special tools needed beyond pliers and screwdriver.
- Install new tilt switch in the base for tip-over detection, securing with M8 threads.
- Route the thermocouple probe along the burner tube, fastening flat terminals (0.19-inch width).
- Test ignition outdoors in a safe area; it should light and hold flame steadily.
Watch YouTube tutorials for your model; most jobs take 20-45 minutes. Always prioritize safety to protect your patio oasis.
Safety first when heating your backyard patio. This kit's protections prevent gas leaks from tip-overs or flame failures, crucial around kids, pets, or garden tools.
- Place heaters on level, non-flammable surfaces away from plants or overhangs.
- Check for hypoxia shut-off to avoid oxygen depletion during extended use.
- Inspect regularly for wear, especially after storms that could foul the thermocouple.
- Use with stable propane tanks and never indoors or in enclosed spaces.
Pair with wind screens for better performance, ensuring cozy, hazard-free nights enhancing your outdoor living space.
Common patio heater woes like no-stay-lit flames often trace to thermocouple or tilt switch faults from falls or dirt buildup. Symptoms include needing constant knob hold or shut-off on release.
- Clean probe gently if fouled before replacing.
- If it sparks but extinguishes, test tilt switch by gently tipping.
- Verify gas flow and igniter; this kit fixes sensor-side problems.
Extending your heater's life means more reliable warmth for garden projects through cooler months. Contact pros for complex electrical issues.

Pros
- Comprehensive components including various bolts, nuts, washers, and wrench for one-stop repair
- High-quality plating prevents rust and loosening in outdoor conditions
- Perfect fit for popular heater models, as confirmed by user experiences
- Fast and straightforward replacement process
- Versatile for reflector shields and general assembly needs
Cons
- Requires confirming heater model and size for compatibility before purchase
- Limited to specific bolt sizes, may not suit all heater brands
- Lightweight kit might need additional parts for extensive repairs
This Lesimnky bolt hardware kit is a must-have for anyone with a propane patio heater in their backyard setup. It provides all the essential screws, bolts, nuts, washers, spacers, and even a wrench to replace missing or worn parts. Ideal for U.S. homeowners who use outdoor heaters to extend patio seasons, especially in variable climates like New York's, where evenings can turn chilly fast.
Key features shine in real-world use: the M6 and M8 sizes fit common round umbrella and pyramid heaters, making it simple to secure heat reflectors or reinforce the base. Gardeners and outdoor enthusiasts appreciate how it prevents wobbling, ensuring safe, efficient radiant heat for gatherings around raised beds or lawn areas without interruptions.
Build quality stands out with rust-preventive plating, holding up well against moisture and temperature swings typical in outdoor patios. Users report it assembles firmly, restoring heaters to full strength quickly.
Limitations include needing to match your heater's specs beforehand, as it's not fully universal. For larger repairs, you might pair it with other parts.
Overall, this kit earns high marks for practicality. If your patio heater needs tightening up, grab this to keep your outdoor living thriving through fall and spring.
Installing the Lesimnky hardware kit is straightforward for backyard maintenance. Start by turning off the propane and letting the heater cool completely.
- Identify loose or missing fasteners on the reflector shield, base, or stand.
- Use the included wrench to remove old parts gently.
- Match M6 or M8 bolts and nuts to holes, adding washers for stability.
- Secure with cap nuts or wing nuts, tightening firmly but not overly so to avoid stripping.
- Test assembly stability before lighting up.
This process takes under 30 minutes, keeping your patio heater ready for garden evenings.
Regular upkeep with quality parts like this kit prolongs your outdoor heater's life. Focus on these steps for best performance:
- Inspect bolts and nuts seasonally for rust or looseness, especially after winter storage.
- Clean around assembly areas to prevent debris buildup affecting heat distribution.
- Apply the rust-resistant hardware during reassembly to combat humidity.
- Store disassembled if needed, using spacers to protect parts.
These habits ensure reliable warmth for your lawn and patio spaces year after year.
This kit works best with round stand-up propane heaters and pyramid styles. Check these details:
- Primary fit: Umbrella-shape patio heaters with M6/M8 threading.
- Also suits: Directional reflectors and burner modules on compatible models.
- Verify before buy: Measure existing bolts (15mm M8, 30mm M6) and count needed pieces.
Not for electric or large commercial units; pair with emitter screens or shields from the same brand for full repairs.

Pros
- Complete kit with everything needed, including wrench, for hassle-free installation
- Galvanized steel provides excellent rust resistance for harsh outdoor conditions
- Universal compatibility works with most freestanding propane patio heaters
- Easy solo setup boosts confidence for beginner DIY gardeners
- Longer studs improve heat spread for better coverage in garden patios
Cons
- Aftermarket part may require minor adjustments for some heater models
- Limited to umbrella-style heaters, not suitable for other shapes
- Small package size means checking quantities for larger repairs
This Firdnyohs replacement hardware kit is a full set of bolts, nuts, washers, spacers, and a wrench designed for umbrella or mushroom-style propane patio heaters. It's perfect for U.S. homeowners who enjoy extending their backyard gardening season into cooler evenings, whether assembling a new heater or fixing a wobbly one after winter storage.
Key features shine in real-world garden use: galvanized parts fend off rust from dew, rain, or snow, while the universal fit covers most freestanding tall heaters. The included longer reflector studs widen heat output, warming larger patio areas where you relax after tending plants. Installation is straightforward, often done alone in under 30 minutes, making it accessible for beginner to experienced gardeners.
Build quality stands up to outdoor exposure with durable, rust-proof materials that outlast standard hardware. It's a smart aftermarket choice that extends your heater's life without buying a whole new unit.
Limitations include its focus on umbrella heaters, so check your model first. Overall, this kit earns high marks for practicality; grab it if your patio heater needs secure fastening to keep those garden gatherings toasty.
Assembling your patio heater with this kit is simple and tool-free beyond the included wrench. Start by laying out parts: 6 M6 nuts, 9 M6x80 screws, 6 M8x150 bolts, and more.
- Attach the base with M8 bolts and washers for stability on your patio deck.
- Secure reflector assembly using M6 screws, spacers, and cap nuts.
- Tighten wing nuts on studs for easy adjustments.
- Use the wrench for final torquing; test stability before lighting propane.
Work on a flat garden surface to avoid losing small parts. Full setup takes 20-40 minutes solo.
Keep your propane patio heater thriving in the backyard with these gardener-friendly habits. Inspect hardware seasonally for looseness or rust.
- Cover the heater during off-season storage to shield from winter elements.
- Clean reflectors and burners annually to maintain even heat for garden patios.
- Check propane connections and replace bolts if worn, using kits like this for quick fixes.
- Position 8-10 feet from plants or walls to avoid scorching garden features.
Regular upkeep ensures safe, efficient warmth for outdoor living all year.
Verify your heater matches before buying: ideal for most round umbrella, pyramid, or mushroom propane models like popular freestanding patio units.
- Measures for standard tall heaters with reflector studs.
- Galvanized M6/M8 sizes fit 90% of market heaters.
- Not for table-top, electric, or non-propane types.
Cross-check your manual's part specs for perfect match in your backyard setup.

Pros
- Perfect fit for popular brands like Hiland, Fire Sense, and Lava Heat, confirmed by users
- Arrives well-packaged to prevent breakage during shipping
- Easy 5-minute installation with included silicone support ring
- Durable quartz material resists high heat and corrosion effectively
- Boosts heater performance for extended outdoor use
Cons
- Requires careful flat handling during removal and installation to avoid breakage
- Fits only 4-sided pyramid models around 87 inches tall, not 3-sided ones
- Heater covers can act as sails in wind, risking tip-overs that damage the tube
This SUMNEW patio heater glass tube replacement is a 49.5-inch tall, 4-inch diameter quartz tube designed for most 4-sided pyramid style outdoor heaters. It suits homeowners with brands like Hiland, Fire Sense, Garden Sun, or AZ Patio Heaters who want to restore warmth to their backyard patios without the hassle of a full replacement.
In real-world use, the tube delivers consistent heat output thanks to its high 1100°C resistance and over 95% light transmittance, making flames visible and efficient for warming seating areas during crisp evenings. Users praise its direct fit and quick swap, often completing the job in minutes while seated on the lawn.
Build quality shines with corrosion resistance far superior to ceramics or steel, plus thermal stability that handles sudden cooling without bursting. The included neoprene silicone ring ensures secure placement, enhancing safety outdoors.
Limitations include the need for gentle handling—keep it flat to prevent cracks—and incompatibility with 3-sided models. For best results, secure your heater against wind to avoid tip-overs.
Overall, this is a smart, durable fix for extending your garden season. Grab it if your heater's tube is cracked; it gets you back to cozy outdoor living fast.
Replacing your patio heater glass tube is straightforward with these steps:
- Turn off and cool the heater completely.
- Lay the unit flat on the ground to safely remove the old tube.
- Position the black silicone ring properly at the base or top as needed.
- Slide the new 49.5-inch tube into place gently.
- Secure and test upright before lighting.
Pro tip: Avoid rushing to prevent breakage, and remove covers in high winds.
This tube fits most 4-sided pyramid heaters around 87 inches tall, including:
- Hiland models: HLDS01-CGTHG, HLDS01-GTHG, HLDS01-GTSS
- Garden Sun: BFC-A-SS, BFH-A-SS
- Fire Sense, AZ Patio Heaters (post-2016), Lava Heat, Dyna-Glo
- Well Traveled Living, Golden Flame, Napoleon
Reference parts: 584736, 639564. Check your model's height and sides first.
Keep your backyard heater safe and long-lasting:
- Always install the silicone ring before use.
- Store indoors during off-seasons to shield from weather.
- Anchor the heater in windy areas to prevent falls.
- Clean gently with a soft cloth; avoid harsh chemicals.
- Inspect annually for cracks before firing up.
These habits ensure reliable heat for many garden seasons.

Pros
- Premium quartz construction resists cracking and provides even heat distribution
- Includes silicone support ring for hassle-free, secure installation
- Wide brand compatibility covers many pyramid-style patio heaters
- High-temperature durability suited for repeated outdoor use
- One-piece tube option available for straightforward upgrades
Cons
- Fits only 87-inch four-sided pyramid heaters, not 91-inch three-sided models
- Glass material requires careful handling during installation to avoid breakage
- Limited to specific part numbers, so verify compatibility before purchase
As a fellow gardener who loves extending patio time into cooler evenings, I appreciate a reliable patio heater glass tube replacement like this 49.5-inch quartz model from YEHERIT. It's designed for 87-inch four-sided pyramid flame heaters from brands such as Hiland and Fire Sense, making it a go-to fix for homeowners whose heaters have foggy or cracked tubes after a season of backyard use.
The standout feature is the thick quartz glass, which handles high temperatures up to 2000°F without warping, ensuring clean, radiant heat that warms your lawn chairs or garden seating evenly. In real-world tests on patios, it reignites the vibrant flame quickly, perfect for those crisp New York fall nights when you want to linger over dinner outdoors.
Build quality shines with its resistance to wind, rain, and UV exposure, outlasting cheaper glass options. The included rubber ring makes swapping it in a breeze, often in under 10 minutes, so you spend less time tinkering and more enjoying your space. It's floor-mounted and outdoor-only, ideal for patios but not indoor greenhouses.
One limitation: it won't fit taller three-sided heaters, so double-check your model. Overall, this tube earns high marks for reviving heaters affordably. If your pyramid patio heater needs a refresh, grab this for dependable warmth that keeps your outdoor living season going strong.
Replacing your patio heater glass tube is straightforward and takes just minutes. Follow these steps for safe, effective installation:
- Turn off the heater, disconnect the gas or power, and let it cool completely.
- Remove the old tube by gently twisting and lifting it out, discarding any broken pieces carefully.
- Insert the new 49.5-inch quartz tube into place, securing it with the included rubber ring at the base.
- Ensure it's centered and stable before reassembling the heater housing.
- Test light the burner in a well-ventilated outdoor area to confirm proper flame.
Handle the glass with care using gloves to prevent fingerprints or cracks. Contact the manufacturer for any fit issues.
This glass tube fits 87-inch four-sided pyramid flame patio heaters. Key compatible brands and models include:
- Hiland (HLDS01-GTHG, HLDS01-GTSS, HLDS01-GTPC)
- Fire Sense, AZ Patio Heaters, Garden Radiance
- Prime Glo, Golden Flame, Garden Sun
- Giantex, Well Traveled Living, Napoleon
- Costco 61220 & 61221, XtremePowerUSA
- Part numbers: 584736, 639564, PH08, BFH-A, NG-GT-BRZ
Note: Does not fit 91-inch three-sided pyramid heaters. Measure your heater's tube (49.5" tall, 4" diameter) to confirm.
Keep your pyramid patio heater thriving year-round with these practical tips:
- Clean the glass tube monthly with a soft cloth and mild soap to prevent soot buildup.
- Store indoors during winter, wrapped in a protective cover to shield from frost.
- Inspect seals and connections annually for leaks before first use.
- Avoid sudden temperature changes to prevent glass stress cracks.
- Use in well-ventilated patios, keeping 3 feet from plants or walls.
Regular upkeep ensures efficient heating for more backyard enjoyment.

Pros
- Easy to assemble with pre-drilled holes and included hardware
- Improves heat reflection and propane efficiency based on user feedback
- Durable aluminum construction resists rust and weather damage
- Perfect replacement that fits most standard patio heaters
- Great value for two units, saving money over full heater replacement
Cons
- May require drilling extra holes for some heater models
- Occasional missing hardware or minor bends reported in reviews
- Exact fit depends on measuring hole spacing accurately
This Kisworm 2-pack reflector shield is a smart replacement part for tall propane patio heaters, especially the mushroom-style ones popular in backyards. It's perfect for U.S. homeowners who love extending their outdoor season for evening relaxation or family dinners on the patio, without the expense of a new heater.
The large 33-inch aluminum dome focuses radiant heat downward, creating a cozier warmth zone over your seating area while saving propane. Users praise how it revives old heaters, directing more heat where you need it most during chilly fall or spring nights in the garden.
Built from flame-resistant, rust-proof aluminum, it holds up against heavy rain, snowstorms, and wind, protecting the burner screen from deformation. The shiny metallic surface not only looks sharp but also enhances the heater's appeal in your backyard setup.
While it fits most models with 6 7/8-inch hole spacing, some gardeners note needing to drill for a precise match, and hardware can occasionally be short. Always measure your heater first.
Overall, this is a reliable choice for practical patio heater maintenance. If your shield is cracked or rusted, grab these for efficient, protected heat that keeps your outdoor living thriving.
Assembling and installing these Kisworm shields is straightforward for any DIY gardener. Follow these steps for a secure fit on your patio heater.
- Remove the protective blue film from all panels.
- Connect the side and central panels using the provided screws and nuts.
- Align the three pre-drilled holes (6 7/8 inches apart) with your heater's burner screen posts.
- Mount the dome and tighten securely; drill additional holes if needed for your model.
- Test the heater to ensure proper heat reflection and clearance.
Measure post-to-post inside distance before buying to confirm compatibility.
Keep your patio heater performing like new with these simple care routines, especially important for backyard use through winter.
- Clean regularly: Wipe the dome with a soft cloth and mild soap after use to remove soot or debris.
- Winter storage: Remove if storing the heater indoors, or leave on for protection from snow.
- Inspect annually: Check for bends, loose screws, or rust before firing up each season.
- Propane efficiency: Ensure the dome sits 2 inches above the burner for optimal heat output.
These steps prevent common issues and maximize the shield's lifespan outdoors.
A good reflector shield like this one transforms your backyard patio into a year-round haven. Pair it with weatherproof seating and string lights for fall cookouts or spring planting sessions.
- Use it to warm up while tending late-season veggies or enjoying post-harvest relaxation.
- Focuses heat on 10-15 foot radius, ideal for small to medium patios.
- Combines well with windbreaks like privacy screens for even better efficiency.
It's a budget-friendly way to make your garden space more inviting as temperatures drop.

Pros
- Sturdy 5-panel aluminum construction feels professional and directs heat effectively
- Easy 3-hole mount aligns perfectly with standard burners for quick setup
- Universal compatibility works with off-brand heaters, as confirmed by users
- Noticeably improves warmth and efficiency without wasting propane
- Rust-resistant and durable for long-term outdoor exposure
Cons
- Requires verifying burner hole spacing for perfect fit on non-standard models
- Single pack means buying multiples for heaters with multiple domes
- Lightweight design may feel less heavy-duty compared to original parts
This Gleom 33-inch patio heater reflector shield is a precision replacement for rusted or damaged tops on most round propane patio heaters. It suits homeowners with backyard patios or garden lounges who want to extend outdoor time into cooler months without chilly spots.
In real-world use, the 5-panel dome captures escaping heat and redirects it at a 70-degree angle downward, creating a cozier zone for family dinners or gatherings. Users note it makes seating areas noticeably warmer while cutting propane use, perfect for efficient heating in variable weather.
Built from solid, rust-proof aluminum, it handles temperatures up to 572°F and resists corrosion from rain or snow. The 3-hole mounting with included hardware installs in minutes, and its 360-degree design protects the burner while maximizing comfort.
One limitation is ensuring your heater's burner holes match the standard spacing; it's not universal for every model. Overall, this shield is a smart, affordable fix for better backyard warmth. We recommend it for anyone maintaining patio heaters to enjoy more outdoor living.
Installing the Gleom reflector shield takes just minutes with basic tools.
- Turn off and cool your patio heater completely.
- Remove the old dome by unscrewing the three mounting bolts from the burner screen.
- Align the new shield's pre-drilled holes with the burner posts.
- Secure with provided hardware, tightening evenly for a snug fit.
- Test by lighting the heater and checking heat distribution.
Always verify hole spacing first to avoid mismatches. This simple swap revives your heater for the season.
Keep your patio heater performing like new with these gardener-friendly tips.
- Clean the reflector annually by wiping with soapy water and a soft cloth; avoid abrasives.
- Store the heater covered during off-seasons to shield from winter snow and debris.
- Inspect for dents or loose bolts before each use, especially after storms.
- Replace damaged parts like this shield promptly to maintain efficiency and safety.
- Position away from overhangs to prevent soot buildup on the dome.
Regular care ensures reliable heat for backyard barbecues and garden evenings.
Enhance your outdoor space with smart heating setups.
- Pair the reflector with seating in a U-shape for focused warmth around the fire pit.
- Use multiple heaters for larger patios, spacing 8-10 feet apart to cover garden lounges.
- Combine with windbreaks like planters or screens to trap heat on breezy nights.
- Position near raised beds or lawn edges to extend harvesting time in cool weather.
These ideas turn chilly spaces into inviting retreats for family and friends.

Pros
- Easy to assemble with included hardware and fits most standard patio heaters
- Durable aluminum construction resists rust and flame damage in harsh weather
- Improves heat efficiency and output for better backyard comfort
- Universal 3-hole mounting simplifies replacement on tall propane models
- Attractive design elevates the look of your patio heater setup
Cons
- May require minor drilling for perfect hole alignment on some heaters
- Occasional reports of missing hardware or slight bends upon arrival
- Not a full heater replacement, so check compatibility before purchase
The Kisworm Patio Heater Reflector Shield is a 33-inch diameter aluminum dome top designed as a replacement part for most tall propane umbrella and mushroom-style patio heaters. It's perfect for U.S. homeowners who love hosting backyard gatherings but need to extend the season with reliable heat. This shield revives older heaters damaged by weather, saving you from expensive full replacements.
In real-world use, the large dome concentrates radiant heat downward, warming patios more effectively while using less propane. Gardeners appreciate how it protects the burner screen from rain, snow, and debris, keeping heat output strong during crisp fall or winter evenings. Assembly is straightforward: peel off the blue film, connect panels with screws, and mount via pre-drilled holes spaced 6 7/8 inches apart.
Build quality shines with flame-resistant, anti-rust aluminum that holds up outdoors year-round. Users note its fast heating and sturdy feel, though minor bends or fit tweaks like drilling can occur. It's energy-efficient for radiant heating on patios up to 200 square feet.
Limitations include potential need for extra hardware or adjustments, but most find it a seamless upgrade. Overall, this is a smart pick for practical backyard maintenance, delivering better heat and longevity for your outdoor living space.
Follow these simple steps for hassle-free setup on your propane patio heater:
- Remove the protective blue film from all panels.
- Align and join the side and central panels using provided screws and nuts.
- Measure hole spacing on your heater's burner screen (6 7/8 inches center-to-center).
- Mount the assembled shield securely; drill additional holes if needed for a snug fit.
- Test for stability before lighting the heater.
Most users complete installation in under 30 minutes with basic tools.
Keep your backyard heater running strong year-round with these tips:
- Clean the reflector shield regularly to remove soot and debris for optimal heat reflection.
- Store indoors during off-season to prevent weather damage.
- Inspect mounting hardware annually and tighten as needed.
- Use a heater cover when not in use to shield from leaves and bird droppings.
- Check propane lines and burner for clogs before each season start.
Regular care extends heater life, especially in variable climates.
Maximize outdoor time with your patio heater:
- Pair with weatherproof seating for fall barbecues or winter stargazing.
- Zone heat around garden fire pits or lounges for efficient coverage.
- Combine with string lights and blankets for cozy garden evenings.
- Use in screened porches or under pergolas for sheltered warmth.
This shield helps create inviting spaces that blur indoor-outdoor living.
Buying Guide for Best Outdoor Heater Parts
Compatibility with Your Heater Model
Before grabbing any replacement part, check compatibility first. Most Best Outdoor Heater Parts like glass tubes from SUMNEW or YEHERITAUTOPARTS fit 4-sided pyramid heaters around 87 inches tall, such as those from Hiland or Fire Sense. They won’t work on 3-sided models, so measure your heater’s height and burner style. Reflector shields from Kisworm or Gleom suit round propane umbrella heaters with 33-inch diameters and standard 3-hole mounts.
For gardeners, mismatched parts mean downtime during prime fall evenings. Look for listings that reference part numbers like HLDS01-GTHG or 584736. Safety sensors like the IDEASURE thermocouple kit work with tower glass tube and standing patio heaters. Always cross-check your model’s manual or burner screen spacing to avoid returns.
Pro tip: Snap a photo of your heater’s base and emitter before shopping. This helps match hardware kits from Firdnyohs or Lesimnky, which include bolts, nuts, and spacers for umbrella-style stands.
Material Quality and Durability
Durable materials stand up to garden weather swings. Quartz glass tubes in SUMNEW and YEHERITAUTOPARTS parts resist high heat and aging, with silicone rings for secure fits. Aluminum reflector shields from HQQoutdoor, Kisworm, and Gleom are rust-proof and flame-resistant, protecting against rain, snow, and UV exposure common in backyard settings.
Hardware kits use galvanized bolts and nuts to prevent rust, extending your heater’s life through multiple seasons. Avoid cheap plastics that crack in cold snaps. For gardeners, these materials mean less maintenance, so you focus on planting instead of repairs.
| Part Type | Key Material | Garden Benefit |
|---|---|---|
| Glass Tube | Quartz Glass | High-temp resistance for reliable burns |
| Reflector Shield | Aluminum | Rust-proof for wet lawns |
| Hardware Kit | Galvanized Steel | Long-lasting assembly |
| Safety Sensor | Heat-Resistant Wire | Weather-sealed connections |
Safety Features
Safety is non-negotiable for patio gatherings. Thermocouple and tilt switch kits from IDEASURE and CookingHeatingRelacements shut off gas if the heater tips or the pilot fails, preventing leaks. These pre-assembled units bypass old faulty sensors easily.
Glass tubes include support rings for stable installation, reducing crack risks. Reflectors direct heat efficiently, minimizing flare-ups. Gardeners appreciate these for family barbecues near play areas or veggie patches.
Ease of Installation
Look for tool-free or minimal-tool installs. Reflector shields come with screws, nuts, and instructions; peel off protective films and mount in minutes. Glass tubes swap out with one-piece designs, no assembly needed.
Hardware kits include wrenches for solo jobs. For gardeners short on time, these save trips to the shed. Test fits dry before lighting up to ensure snugness.
Size and Precise Fit
Standard sizes dominate: 49.5-inch by 4-inch glass tubes for pyramid burners, 33-inch dome reflectors for round tops. Verify hole spacing (like 6 7/8 inches on shields) matches your burner screen.
Thermocouples offer 13.8-inch lengths with M8 threads for common valves. Precise fits prevent wobbles in windy garden spots.
Heat Efficiency and Performance
Domes like Gleom’s 5-panel design reflect heat downward, saving fuel and warming patios evenly. Quality glass ensures clean combustion. These boost output for larger lawn areas.
For gardeners, efficient parts mean more evenings outdoors harvesting or relaxing.
Why You Should Trust Us
At New York Garden, we specialize in practical reviews for gardeners and homeowners. Our team analyzes product specs, customer feedback patterns, and manufacturer claims to highlight what works in real U.S. backyards. We focus on Best Outdoor Heater Parts that align with everyday garden use, like weather resistance for rainy falls or quick installs for busy weekends.
We prioritize transparency, referencing compatibility lists and features directly from data. No fluff, just honest insights to help you choose confidently. Check our Outdoor Heater Replacement Parts category for more options tailored to your setup.
Final Thoughts
After reviewing these Best Outdoor Heater Parts, the SUMNEW Patio Heater Glass Tube Replacement stands out as our best overall pick. Its quartz construction and easy one-piece install with support ring make it ideal for gardeners fixing pyramid heaters quickly, ensuring steady heat for patio planning sessions.
For best value, go with the CookingHeatingRelacements Outdoor Heater Replacement Parts Thermocouple & Tilt Switch kit. This safety-focused duo fits most stand-up and pyramid models, offering reliable protection without complexity, perfect for budget-conscious gardeners prioritizing safety around kids or pets.
The Gleom 33″ Patio Heater Reflector Shield is best for maximizing heat in open lawns. Its heavy-duty aluminum dome and easy 3-hole mount reflect warmth efficiently, conserving propane while shielding from elements. Pair it with hardware from Lesimnky for a full refresh. Explore related picks in our Outdoor Heating & Cooling section or Outdoor Heaters guide.
FAQs
Do Best Outdoor Heater Parts fit all outdoor heaters?
No, most Best Outdoor Heater Parts target specific styles like 4-sided pyramid or round umbrella propane heaters. Check dimensions and part numbers for Hiland, Fire Sense, or similar. Universal claims often need minor adjustments like drilling.
How do I install a glass tube replacement?
Remove the old tube, insert the new one with its silicone ring, and secure. It takes minutes for models from SUMNEW or YEHERITAUTOPARTS. Always cool the heater first and wear gloves.
Are reflector shields worth it for gardeners?
Yes, they direct heat downward, warming patios better and saving propane. Kisworm or HQQoutdoor options protect against weather, extending usability in variable garden climates of 2026.
What if my thermocouple fails?
Replace with kits like IDEASURE’s pre-assembled thermocouple and tilt switch. They restore pilot light stability and tip-over protection for safe operation around your lawn.
Can hardware kits fix loose patio heaters?
Absolutely, Firdnyohs or Lesimnky kits include all bolts, nuts, and spacers for sturdy reassembly. Galvanized parts resist rust, keeping your heater garden-ready longer. See outdoor heaters with auto shut-off for full units.


Write Your Review
No reviews yet. Be the first to share your experience!