As fellow gardeners, we know how frustrating it can be when your patio heater quits right as cooler evenings roll in, cutting short those relaxing moments in the backyard after tending the lawn or harvest. Best Mushroom Heater Parts are essential for keeping mushroom-style outdoor heaters running smoothly, whether you’re firing up a gathering spot near your vegetable patch or creating a cozy extension to your garden lounge. In this guide, we’ve curated 10 standout Best Mushroom Heater Parts from 2026 to help you maintain heat efficiently without buying a whole new unit.
These replacement parts focus on common wear items like reflectors, safety valves, hardware kits, and burners, tailored for the demands of American gardens where weather swings challenge durability. You’ll get gardener-friendly advice on selecting parts that match your setup, install easily, and boost propane efficiency for longer sessions under the stars. Let’s dive into options that keep your outdoor space inviting all season.
Top Products

Pros
- Complete kit with everything needed, including wrench, for hassle-free installation
- Galvanized steel provides excellent rust resistance for harsh outdoor conditions
- Universal compatibility works with most freestanding propane patio heaters
- Easy solo setup boosts confidence for beginner DIY gardeners
- Longer studs improve heat spread for better coverage in garden patios
Cons
- Aftermarket part may require minor adjustments for some heater models
- Limited to umbrella-style heaters, not suitable for other shapes
- Small package size means checking quantities for larger repairs
This Firdnyohs replacement hardware kit is a full set of bolts, nuts, washers, spacers, and a wrench designed for umbrella or mushroom-style propane patio heaters. It's perfect for U.S. homeowners who enjoy extending their backyard gardening season into cooler evenings, whether assembling a new heater or fixing a wobbly one after winter storage.
Key features shine in real-world garden use: galvanized parts fend off rust from dew, rain, or snow, while the universal fit covers most freestanding tall heaters. The included longer reflector studs widen heat output, warming larger patio areas where you relax after tending plants. Installation is straightforward, often done alone in under 30 minutes, making it accessible for beginner to experienced gardeners.
Build quality stands up to outdoor exposure with durable, rust-proof materials that outlast standard hardware. It's a smart aftermarket choice that extends your heater's life without buying a whole new unit.
Limitations include its focus on umbrella heaters, so check your model first. Overall, this kit earns high marks for practicality; grab it if your patio heater needs secure fastening to keep those garden gatherings toasty.
Assembling your patio heater with this kit is simple and tool-free beyond the included wrench. Start by laying out parts: 6 M6 nuts, 9 M6x80 screws, 6 M8x150 bolts, and more.
- Attach the base with M8 bolts and washers for stability on your patio deck.
- Secure reflector assembly using M6 screws, spacers, and cap nuts.
- Tighten wing nuts on studs for easy adjustments.
- Use the wrench for final torquing; test stability before lighting propane.
Work on a flat garden surface to avoid losing small parts. Full setup takes 20-40 minutes solo.
Keep your propane patio heater thriving in the backyard with these gardener-friendly habits. Inspect hardware seasonally for looseness or rust.
- Cover the heater during off-season storage to shield from winter elements.
- Clean reflectors and burners annually to maintain even heat for garden patios.
- Check propane connections and replace bolts if worn, using kits like this for quick fixes.
- Position 8-10 feet from plants or walls to avoid scorching garden features.
Regular upkeep ensures safe, efficient warmth for outdoor living all year.
Verify your heater matches before buying: ideal for most round umbrella, pyramid, or mushroom propane models like popular freestanding patio units.
- Measures for standard tall heaters with reflector studs.
- Galvanized M6/M8 sizes fit 90% of market heaters.
- Not for table-top, electric, or non-propane types.
Cross-check your manual's part specs for perfect match in your backyard setup.

Pros
- Easy to assemble with included hardware and fits most standard patio heaters
- Durable aluminum construction resists rust and flame damage in harsh weather
- Improves heat efficiency and output for better backyard comfort
- Universal 3-hole mounting simplifies replacement on tall propane models
- Attractive design elevates the look of your patio heater setup
Cons
- May require minor drilling for perfect hole alignment on some heaters
- Occasional reports of missing hardware or slight bends upon arrival
- Not a full heater replacement, so check compatibility before purchase
The Kisworm Patio Heater Reflector Shield is a 33-inch diameter aluminum dome top designed as a replacement part for most tall propane umbrella and mushroom-style patio heaters. It's perfect for U.S. homeowners who love hosting backyard gatherings but need to extend the season with reliable heat. This shield revives older heaters damaged by weather, saving you from expensive full replacements.
In real-world use, the large dome concentrates radiant heat downward, warming patios more effectively while using less propane. Gardeners appreciate how it protects the burner screen from rain, snow, and debris, keeping heat output strong during crisp fall or winter evenings. Assembly is straightforward: peel off the blue film, connect panels with screws, and mount via pre-drilled holes spaced 6 7/8 inches apart.
Build quality shines with flame-resistant, anti-rust aluminum that holds up outdoors year-round. Users note its fast heating and sturdy feel, though minor bends or fit tweaks like drilling can occur. It's energy-efficient for radiant heating on patios up to 200 square feet.
Limitations include potential need for extra hardware or adjustments, but most find it a seamless upgrade. Overall, this is a smart pick for practical backyard maintenance, delivering better heat and longevity for your outdoor living space.
Follow these simple steps for hassle-free setup on your propane patio heater:
- Remove the protective blue film from all panels.
- Align and join the side and central panels using provided screws and nuts.
- Measure hole spacing on your heater's burner screen (6 7/8 inches center-to-center).
- Mount the assembled shield securely; drill additional holes if needed for a snug fit.
- Test for stability before lighting the heater.
Most users complete installation in under 30 minutes with basic tools.
Keep your backyard heater running strong year-round with these tips:
- Clean the reflector shield regularly to remove soot and debris for optimal heat reflection.
- Store indoors during off-season to prevent weather damage.
- Inspect mounting hardware annually and tighten as needed.
- Use a heater cover when not in use to shield from leaves and bird droppings.
- Check propane lines and burner for clogs before each season start.
Regular care extends heater life, especially in variable climates.
Maximize outdoor time with your patio heater:
- Pair with weatherproof seating for fall barbecues or winter stargazing.
- Zone heat around garden fire pits or lounges for efficient coverage.
- Combine with string lights and blankets for cozy garden evenings.
- Use in screened porches or under pergolas for sheltered warmth.
This shield helps create inviting spaces that blur indoor-outdoor living.

Pros
- Easy DIY installation in 20-45 minutes with basic tools and online videos
- Perfect fit and immediate fix for heaters that won't stay lit
- High-quality components ensure safety features work flawlessly
- Versatile compatibility with common round and pyramid patio heaters
- Restores full functionality for reliable backyard heating
Cons
- May need minor housing adjustments like drilling for thermocouple on some models
- Requires careful disassembly; taking photos helps with reassembly
- Best for specific propane heater types, check compatibility first
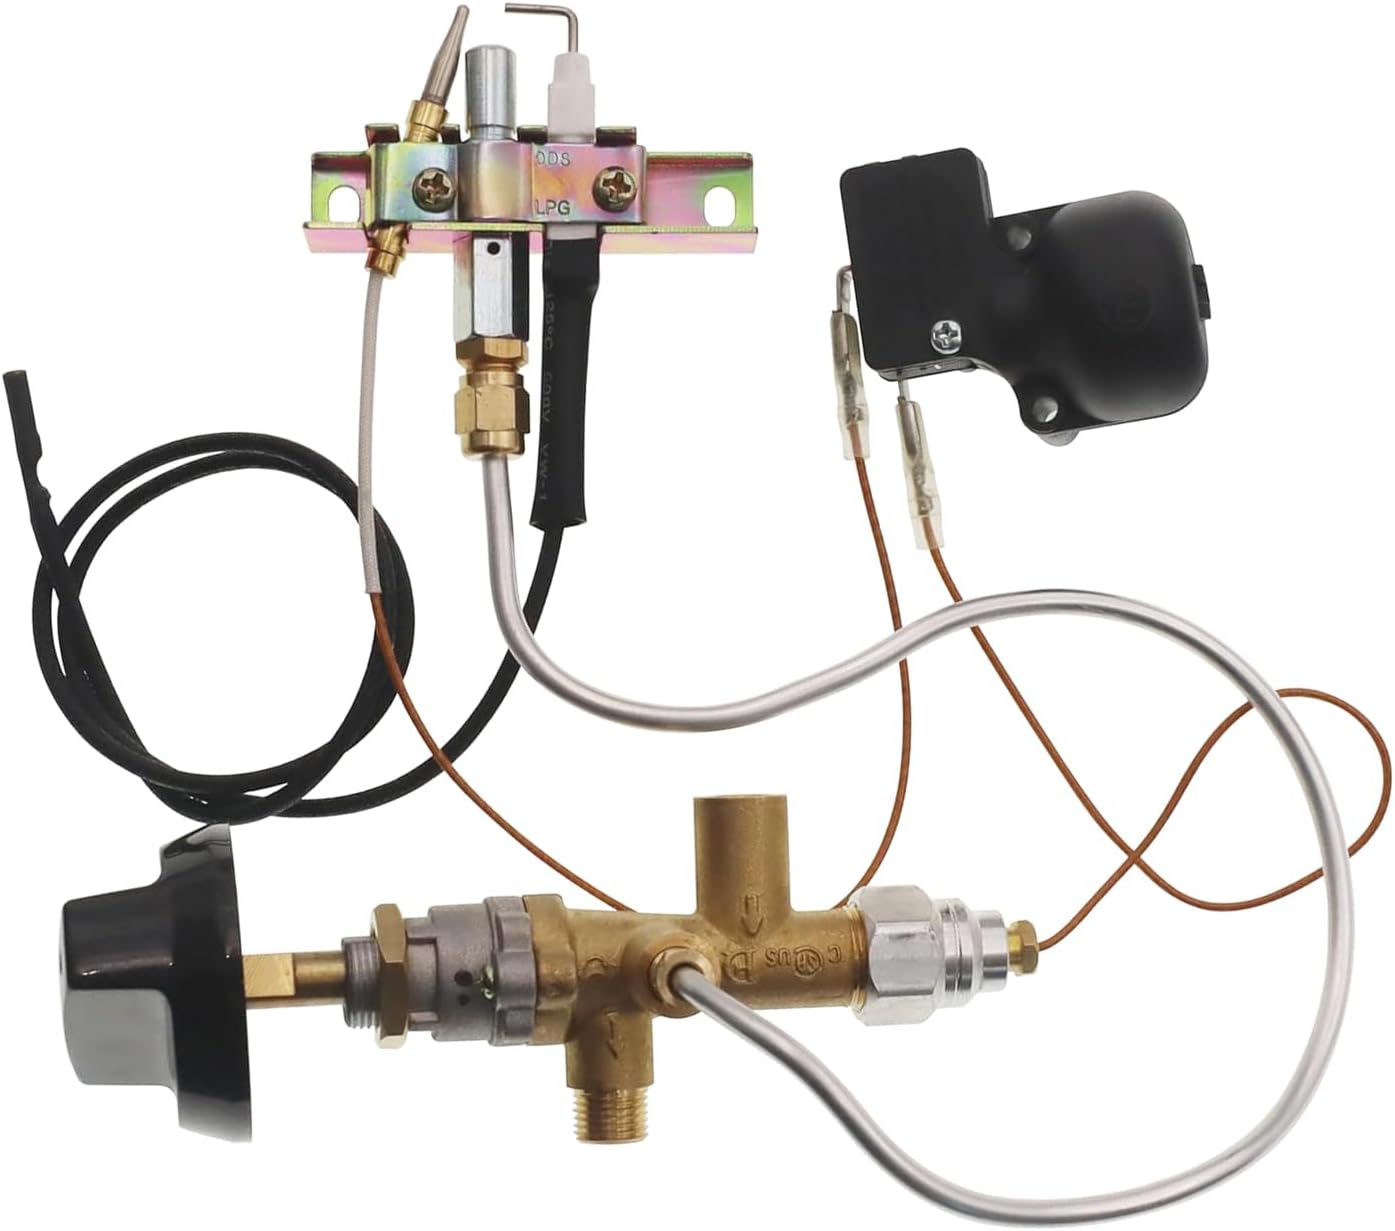
This thermocouple and tilt switch kit is a smart fix for common safety failures in round stand-up and pyramid propane patio heaters. It's perfect for U.S. homeowners who love extending their backyard season, whether hosting fall barbecues or relaxing after lawn care on cooler evenings.
Key features include automatic shut-off for tip-overs, flame-out, or low oxygen, with a 13.8-inch thermocouple probe and easy-screw mounting. In real-world use, gardeners report it ignites steadily on the first try, solving issues like heaters that won't stay lit after wind gusts or accidental knocks during patio setup. The combo kit covers multiple failure points efficiently.
Build quality shines with 100% inspected parts designed for outdoor durability against weather exposure. Users praise the precise fit, though some note minor tweaks for older housings. It's lightweight at 0.16 pounds, making it simple to handle during repairs.
Limitations include model-specific fit, so verify your heater type. Not a full overhaul, but ideal for targeted fixes. Overall, this kit earns top marks for restoring safe, reliable heat, letting you focus on garden enjoyment rather than replacements. Grab it if your patio heater falters; it's a backyard essential.
Replacing the thermocouple and tilt switch is a straightforward DIY project for any gardener handy with basic tools. Start by turning off the propane and letting the heater cool completely.
- Take photos during disassembly to note wire and mounting positions.
- Remove old parts by unscrewing nuts and disconnecting terminals; no special tools needed beyond pliers and screwdriver.
- Install new tilt switch in the base for tip-over detection, securing with M8 threads.
- Route the thermocouple probe along the burner tube, fastening flat terminals (0.19-inch width).
- Test ignition outdoors in a safe area; it should light and hold flame steadily.
Watch YouTube tutorials for your model; most jobs take 20-45 minutes. Always prioritize safety to protect your patio oasis.
Safety first when heating your backyard patio. This kit's protections prevent gas leaks from tip-overs or flame failures, crucial around kids, pets, or garden tools.
- Place heaters on level, non-flammable surfaces away from plants or overhangs.
- Check for hypoxia shut-off to avoid oxygen depletion during extended use.
- Inspect regularly for wear, especially after storms that could foul the thermocouple.
- Use with stable propane tanks and never indoors or in enclosed spaces.
Pair with wind screens for better performance, ensuring cozy, hazard-free nights enhancing your outdoor living space.
Common patio heater woes like no-stay-lit flames often trace to thermocouple or tilt switch faults from falls or dirt buildup. Symptoms include needing constant knob hold or shut-off on release.
- Clean probe gently if fouled before replacing.
- If it sparks but extinguishes, test tilt switch by gently tipping.
- Verify gas flow and igniter; this kit fixes sensor-side problems.
Extending your heater's life means more reliable warmth for garden projects through cooler months. Contact pros for complex electrical issues.

Pros
- Easy installation for compatible models, as noted by users who got perfect fits
- Built-in safety devices like tilt switch and dump switch add reliable protection
- Complete kit with tubes, seals, and wires covers most pilot burner needs
- Lightweight at 10.9 ounces for simple handling during backyard maintenance
Cons
- Mixed threading (M10 metric inlet, 7/16 NPT outlet) often requires adapters
- Not truly universal; may not fit specific brands like AZ or Lowe's patio heaters
- Lacks detailed instructions, leading to assembly challenges for some
This EVIMOTAL kit is a universal replacement set for propane fire pits and patio heaters, featuring a brass safety valve, connecting tubes, tilt switch, and pilot components. It suits handy homeowners who maintain backyard setups for fall gatherings or chilly evenings after gardening.
Key elements include an M10 inlet valve, 7/16-inch outlet, M8 pilot thread, and a 39.5-inch aluminum tube with sealing rings for secure gas flow. In real-world use, it restores ignition and heat output reliably when threads match, helping extend outdoor living without new purchases. The anti-tilt switch (THP-ATM) and FD4 dump switch provide essential safety for patio use.
Build quality features durable brass and aluminum parts that hold up outdoors, though the lightweight design means careful handling during installs. Users praise quick fixes but note fit issues with non-standard heaters.
Limitations arise from the metric-NPT thread mix and lack of adapters, so measure your setup first. It's not ideal for beginners without tools.
Overall, a solid choice for matching repairs; verify compatibility to avoid frustration and keep your backyard fire pit thriving.
Follow these steps for smooth setup on your propane fire pit or patio heater.
- Verify threads: inlet M10*1, outlet 7/16-24 UNS, pilot M8*1.
- Place copper sealing rings at both ends of the 4mm aluminum tube.
- Fasten tube with nuts and caps to valve and pilot burner.
- Disconnect gas supply and ensure heater is cool.
- Remove old valve and components.
- Assemble new kit per thread matches; use spare 20cm wire if needed.
- Test for leaks before lighting.
Tools like wrenches help; work in a well-ventilated backyard area.
Prioritize safety with this kit's features for worry-free backyard heating.
- Tilt Switch: Shuts off gas if heater tips, preventing fires during wind or bumps.
- Safety Valve: Brass construction controls propane flow reliably.
- Pilot Assembly: Ensures stable ignition with 25cm wire lead.
Always check for gas leaks post-install, keep away from plants or dry lawns, and never leave unattended. These parts enhance protection for family outdoor spaces.
Confirm fit before buying to avoid returns on your patio heater repair.
- Measure inlet: M10*1 metric.
- Outlet: 7/16-24 UNS NPT.
- Pilot: M8*1 for 4mm tube.
- Avoid AZ patio heaters or similar; search your model specifically.
- Tube diameter: 0.16 inches; wire terminals: flat 4.8mm.
If unsure, compare to original parts for backyard fire pit success.
Pros
- Complete kit with valve, pilot, tilt switch, and tubes covers most common heater failures
- Universal terminals and threading compatible with brands like Hampton Bay and Garden Treasures
- Safety-focused components enhance reliability for repeated outdoor use
- Lightweight at 11.3 ounces, easy to handle during backyard repairs
Cons
- Specific thread sizes (M10*1 inlet, M8*1 pilot) require checking compatibility before purchase
- Propane-only design, not suitable for natural gas heaters
- Installation needs basic tools and gas knowledge, not fully plug-and-play
This PAHQER universal replacement kit provides essential parts for propane patio heaters, including the pilot burner assembly, main control valve, tilt switch, and connecting tubes. It suits homeowners with standing tower heaters, table fire pits, or mushroom-style patio models who want to fix ignition or safety issues rather than replace the entire unit. Perfect for New York Garden readers extending their outdoor season with reliable backyard warmth.
- Key components like the M10*1 inlet valve and 7/16" outlet ensure proper gas flow in real-world setups.
- The 25cm pilot wire and flat 4.8mm terminals make wiring straightforward for most repairs.
In garden performance, it restores flame stability and oxygen depletion safety, vital for safe use near plants or seating areas. The anti-tilt dump switch (THP-ATM Micro) activates at 25-45 degrees, protecting against wind gusts or bumps during patio parties. Build quality features durable aluminum tubes with copper sealing rings for weather resistance, holding up through fall and spring use.
Limitations include propane specificity and precise threading, so measure your heater first. Overall, this kit earns a solid recommendation for practical gardeners: install it yourself to save time and keep your fire pit heating efficiently.
Check your heater model against these fits: Hampton Bay patio heaters (HSS-A-SS, GS4400 series), Lowes Garden Treasures 0574422, and most RA series cabinet or tank-top styles. Not for natural gas units.
- Verify threads: Inlet M10*1, outlet 7/16"-24 UNS, pilot M8*1.
- Assemble with copper rings, nuts, and caps on aluminum tubes for leak-free seals.
- Wire the 25cm pilot lead and 20cm spare to flat 4.8mm terminals.
For install: Turn off gas, remove old parts, attach new valve and pilot, test tilt switch. Use in well-ventilated patios.
Safety is priority with thermoelectric valve auto-shutoff on pilot failure and FD4 dump switch for oxygen protection. Tilt switch cuts gas at tip-over, essential for backyard fire pits near kids or pets.
- Clean pilot orifice yearly to prevent soot buildup.
- Inspect tubes and seals before each season for cracks.
- Store kit dry in garage during winter to avoid corrosion.
Maintain by checking wire connections annually; replace if frayed for long-term outdoor reliability.
Pros
- Easy installation with included bolts and nuts, as praised by users
- Sturdy stainless steel construction for outdoor durability
- Smooth-rolling wheels revive heater mobility perfectly
- Broad compatibility with popular patio heater models
- Lightweight at just 9.6 ounces for effortless handling
Cons
- Guaranteed fit only for NCZH and HSS models; check base size for others
- Wheels suited for smooth surfaces, not ideal for rough gravel terrain
- Provides only two wheels, standard but may need extras for full stability
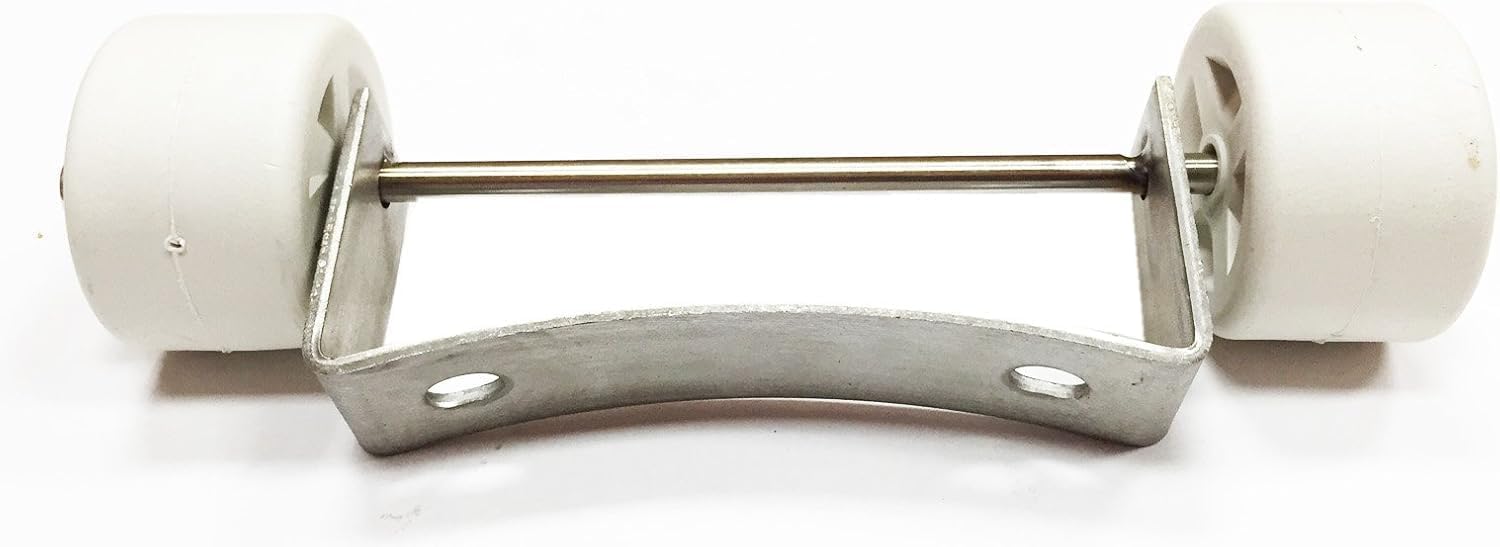
This universal patio heater wheel kit is a simple replacement part that adds casters to the base of tall propane mushroom-style heaters. It suits backyard enthusiasts who use patio heaters for fall evenings or garden gatherings but find their units hard to move due to worn or missing wheels.
Key features include a high-quality stainless steel mounting bracket and pre-installed white wheels with 3.93-inch spacing. In real-world use, it performs reliably on patios and lawns, allowing smooth repositioning for optimal warmth coverage. Users report perfect fit and easy rolling, making setup a breeze during seasonal transitions.
Build quality stands out with rust-proof stainless steel that holds up outdoors, paired with lightweight components for easy handling. At 7.8 inches long overall, it's compact yet sturdy for everyday garden tasks.
Limitations include best compatibility with round-base heaters; uneven ground may challenge the wheels over time. Still, for standard patios, it excels.
Overall, this kit is a practical upgrade for maintaining mobile comfort in your outdoor space. Grab it if your heater needs fresh wheels for better backyard living.
Installing this patio heater wheel kit takes minutes with basic tools. Follow these steps for smooth results:
- Tip the heater safely on its side on a soft surface to access the base.
- Remove old wheels or brackets if present, using a wrench for bolts.
- Align the 3.93-inch spaced brackets with base holes.
- Secure with provided bolts and nuts; tighten firmly but not overly.
- Test roll on flat ground before upright use.
Users confirm it's a snap, restoring mobility fast for your next garden event.
This kit fits most tall patio heaters with round bases, like mushroom umbrella styles. It's guaranteed for NCZH and HSS models and works universally where spacing matches 3.93 inches.
- Measure your heater base holes for 3.93-inch centers.
- Best for propane outdoor heaters up to standard tall sizes.
- Not for freestanding or non-round bases; verify before purchase.
Perfect for common backyard setups from various brands.
Keep your wheeled patio heater thriving with these maintenance habits:
- Clean wheels regularly to prevent debris buildup and ensure smooth rolls.
- Store indoors during winter to protect stainless brackets from harsh freeze-thaw cycles.
- Inspect bolts seasonally and tighten as needed for safety.
- Avoid dragging on rough surfaces to extend wheel life.
These steps maximize mobility and longevity for cozy outdoor seasons.

Pros
- Durable brass valves and thermocouples for reliable performance in damp backyard conditions
- Includes extras like two thermocouples and tilt switches for multiple repairs or spares
- Simple connection process speeds up fixes without needing professional help
- High sensitivity sensors ensure quick flame detection and gas shutoff
- Compact size stores easily in your garden shed toolkit
Cons
- Requires thread tape for leak-free seals, adding a small extra step
- Specific threading may not fit all heater models without checking compatibility
- Best for low-pressure systems only, limiting use on high-pressure setups
This Threlaco patio heater replacement kit provides essential safety parts: one main control valve, two tilt switches, and two thermocouples designed for propane fire pits and outdoor heaters. It's perfect for U.S. homeowners who use patio heaters to extend backyard enjoyment into cooler evenings, especially those maintaining gardens and lawns year-round.
Key features shine in real-world use, like the thermocouple's quick flame sensing that signals the valve to release gas only when ignited, preventing leaks. Tilt switches cut power and gas if the unit tips, ideal for breezy patios near tall garden plants. The brass materials handle moisture well, performing steadily during damp fall nights.
Build quality feels solid with threaded connections that promise tight fits outdoors, though applying thread tape helps avoid leaks. It's lightweight at under 8 ounces, easy to handle during installs. Durability suits seasonal storage in garden sheds without rust issues if kept dry.
Limitations include compatibility with low-pressure propane systems and specific thread sizes, so measure your heater first. Not for high-pressure or non-propane units.
Overall, this kit earns a strong recommendation for practical gardeners wanting safe, reliable patio heating. Swap in these parts to revive your fire pit and host more outdoor gatherings worry-free.
Installing this kit is straightforward for handy gardeners. Gather tools like pliers, thread tape, and a wrench.
- Turn off gas and disconnect the heater.
- Remove old valve, thermocouples, and switches.
- Wrap threads with tape, connect thermocouple to valve and igniter.
- Attach tilt switches to the dump ports.
- Test for leaks with soapy water before lighting.
Full install takes under 30 minutes, keeping your backyard heater ready for action.
Maximize safety with these tips for patio heaters in garden settings.
- Place heaters on level, non-flammable surfaces away from plants and overhangs.
- Inspect parts seasonally for wear, especially after winter storage.
- Never leave unattended while lit, and use in well-ventilated areas.
- Teach family the tilt switch function to avoid accidental tips.
- Store propane tanks upright and secured in your garden area.
These habits pair perfectly with the kit's sensors for peace of mind outdoors.
Common issues and fixes for patio heater safety parts.
- Pilot won't light: Check thermocouple connection and cleanliness.
- Heater shuts off randomly: Test tilt switch for sensitivity or level surface.
- Gas smell: Reapply thread tape and tighten fittings.
- Flame unstable: Verify low-pressure compatibility and valve threads.
Quick checks keep your fire pit reliable for backyard use.

Pros
- Comprehensive components including various bolts, nuts, washers, and wrench for one-stop repair
- High-quality plating prevents rust and loosening in outdoor conditions
- Perfect fit for popular heater models, as confirmed by user experiences
- Fast and straightforward replacement process
- Versatile for reflector shields and general assembly needs
Cons
- Requires confirming heater model and size for compatibility before purchase
- Limited to specific bolt sizes, may not suit all heater brands
- Lightweight kit might need additional parts for extensive repairs
This Lesimnky bolt hardware kit is a must-have for anyone with a propane patio heater in their backyard setup. It provides all the essential screws, bolts, nuts, washers, spacers, and even a wrench to replace missing or worn parts. Ideal for U.S. homeowners who use outdoor heaters to extend patio seasons, especially in variable climates like New York's, where evenings can turn chilly fast.
Key features shine in real-world use: the M6 and M8 sizes fit common round umbrella and pyramid heaters, making it simple to secure heat reflectors or reinforce the base. Gardeners and outdoor enthusiasts appreciate how it prevents wobbling, ensuring safe, efficient radiant heat for gatherings around raised beds or lawn areas without interruptions.
Build quality stands out with rust-preventive plating, holding up well against moisture and temperature swings typical in outdoor patios. Users report it assembles firmly, restoring heaters to full strength quickly.
Limitations include needing to match your heater's specs beforehand, as it's not fully universal. For larger repairs, you might pair it with other parts.
Overall, this kit earns high marks for practicality. If your patio heater needs tightening up, grab this to keep your outdoor living thriving through fall and spring.
Installing the Lesimnky hardware kit is straightforward for backyard maintenance. Start by turning off the propane and letting the heater cool completely.
- Identify loose or missing fasteners on the reflector shield, base, or stand.
- Use the included wrench to remove old parts gently.
- Match M6 or M8 bolts and nuts to holes, adding washers for stability.
- Secure with cap nuts or wing nuts, tightening firmly but not overly so to avoid stripping.
- Test assembly stability before lighting up.
This process takes under 30 minutes, keeping your patio heater ready for garden evenings.
Regular upkeep with quality parts like this kit prolongs your outdoor heater's life. Focus on these steps for best performance:
- Inspect bolts and nuts seasonally for rust or looseness, especially after winter storage.
- Clean around assembly areas to prevent debris buildup affecting heat distribution.
- Apply the rust-resistant hardware during reassembly to combat humidity.
- Store disassembled if needed, using spacers to protect parts.
These habits ensure reliable warmth for your lawn and patio spaces year after year.
This kit works best with round stand-up propane heaters and pyramid styles. Check these details:
- Primary fit: Umbrella-shape patio heaters with M6/M8 threading.
- Also suits: Directional reflectors and burner modules on compatible models.
- Verify before buy: Measure existing bolts (15mm M8, 30mm M6) and count needed pieces.
Not for electric or large commercial units; pair with emitter screens or shields from the same brand for full repairs.

Pros
- Exact factory fit for NCZH heaters with mushroom reflectors
- Durable stainless steel resists corrosion and warping
- Restores optimal heat and flame performance quickly
- Straightforward installation using existing hardware
- Direct from OEM manufacturer for trusted quality
Cons
- Mounting flange may need swapping with your original
- Specific to NCZH round-top models, not universal fit
- Limited to propane-fueled standing heaters
This Gardensun NCZH burner assembly is a genuine OEM replacement designed specifically for tall standing round-top patio heaters with mushroom-style reflectors. It's perfect for backyard gardeners and patio enthusiasts who want to revive their heater without hassle, especially if yours has a worn or clogged burner causing weak flames.
In real-world use, it delivers strong, consistent heat output that warms up patios evenly, making it great for extending outdoor dinners or relaxing evenings as temperatures drop. The stainless steel construction handles direct flame and weather exposure well, outperforming cheaper generics that warp or rust quickly.
Build quality shines with its heavy-duty materials built for season-after-season reliability in home backyards or rental properties. Installation is simple, dropping right in with your existing hardware, though one user noted swapping the flange for the best fit.
Limitations include its model-specific design, so check your heater matches NCZH specs. Overall, it's a smart choice to restore factory performance and enjoy your outdoor space more comfortably. Highly recommend for anyone maintaining patio heaters.
Turn off and disconnect propane before starting. Remove the old burner by unscrewing the mounting hardware.
- Align the new assembly with existing holes for a drop-in fit.
- Use your original flange if the included one doesn't match perfectly.
- Secure with provided or existing screws, no drilling needed.
- Test for leaks and proper flame after reconnecting gas.
Whole process takes under 30 minutes for most users.
Keep your heater running strong with these tips:
- Clean the burner annually to prevent clogs from debris or insects.
- Store indoors during winter to protect from harsh weather.
- Check for rust or warping before each season and replace parts like this burner as needed.
- Use a cover when not in use to extend overall lifespan.
Regular care ensures efficient heat and safety for backyard enjoyment.
Common problems and fixes:
- Weak flame: Clogged or worn burner; replace with OEM unit.
- Uneven heat: Misaligned reflector or burner; ensure proper installation.
- No ignition: Check propane flow and clean emitter screen.
Address issues early to avoid full heater replacement.

Pros
- Easy to assemble with pre-drilled holes and included hardware
- Improves heat reflection and propane efficiency based on user feedback
- Durable aluminum construction resists rust and weather damage
- Perfect replacement that fits most standard patio heaters
- Great value for two units, saving money over full heater replacement
Cons
- May require drilling extra holes for some heater models
- Occasional missing hardware or minor bends reported in reviews
- Exact fit depends on measuring hole spacing accurately
This Kisworm 2-pack reflector shield is a smart replacement part for tall propane patio heaters, especially the mushroom-style ones popular in backyards. It's perfect for U.S. homeowners who love extending their outdoor season for evening relaxation or family dinners on the patio, without the expense of a new heater.
The large 33-inch aluminum dome focuses radiant heat downward, creating a cozier warmth zone over your seating area while saving propane. Users praise how it revives old heaters, directing more heat where you need it most during chilly fall or spring nights in the garden.
Built from flame-resistant, rust-proof aluminum, it holds up against heavy rain, snowstorms, and wind, protecting the burner screen from deformation. The shiny metallic surface not only looks sharp but also enhances the heater's appeal in your backyard setup.
While it fits most models with 6 7/8-inch hole spacing, some gardeners note needing to drill for a precise match, and hardware can occasionally be short. Always measure your heater first.
Overall, this is a reliable choice for practical patio heater maintenance. If your shield is cracked or rusted, grab these for efficient, protected heat that keeps your outdoor living thriving.
Assembling and installing these Kisworm shields is straightforward for any DIY gardener. Follow these steps for a secure fit on your patio heater.
- Remove the protective blue film from all panels.
- Connect the side and central panels using the provided screws and nuts.
- Align the three pre-drilled holes (6 7/8 inches apart) with your heater's burner screen posts.
- Mount the dome and tighten securely; drill additional holes if needed for your model.
- Test the heater to ensure proper heat reflection and clearance.
Measure post-to-post inside distance before buying to confirm compatibility.
Keep your patio heater performing like new with these simple care routines, especially important for backyard use through winter.
- Clean regularly: Wipe the dome with a soft cloth and mild soap after use to remove soot or debris.
- Winter storage: Remove if storing the heater indoors, or leave on for protection from snow.
- Inspect annually: Check for bends, loose screws, or rust before firing up each season.
- Propane efficiency: Ensure the dome sits 2 inches above the burner for optimal heat output.
These steps prevent common issues and maximize the shield's lifespan outdoors.
A good reflector shield like this one transforms your backyard patio into a year-round haven. Pair it with weatherproof seating and string lights for fall cookouts or spring planting sessions.
- Use it to warm up while tending late-season veggies or enjoying post-harvest relaxation.
- Focuses heat on 10-15 foot radius, ideal for small to medium patios.
- Combines well with windbreaks like privacy screens for even better efficiency.
It's a budget-friendly way to make your garden space more inviting as temperatures drop.
Best Mushroom Heater Parts Buying Guide
Material Durability and Weather Resistance
When picking Best Mushroom Heater Parts, prioritize materials that stand up to rain, snow, and UV exposure common in garden settings. Aluminum reflector shields, like those from Kisworm, resist rust and flame damage while concentrating heat downward to warm your patio effectively. Stainless steel burners and brass valves, such as in the GARDENSUN assembly or safety kits, prevent corrosion and warping, ensuring seasons of reliable use without frequent swaps.
For gardeners, this means less downtime during fall cleanup or spring startups. Galvanized hardware kits from brands like Firdnyohs or Lesimnky hold up against loosening from wind or thermal expansion, keeping your heater stable on uneven lawn surfaces. Test for thickness and coatings; thicker aluminum domes (around 33 inches) protect better in storms, saving propane and your budget long-term.
A quick tip: Inspect your current heater for material matches to avoid galvanic corrosion between dissimilar metals, which can accelerate wear in humid garden environments.
Compatibility and Universal Fit
Most Best Mushroom Heater Parts claim universal fit for mushroom or umbrella patio heaters, but check hole spacing and dimensions. Kisworm’s 33-inch reflector shields with 6 7/8-inch 3-hole mounts suit NCZH and HSS models, while bolt kits include spacers for pyramid or round bases. Wheel kits with 3.93-inch spacing roll smoothly on most tall propane units, ideal for maneuvering around garden beds.
Gardeners often deal with mixed brands, so look for pre-drilled options or adjustable hardware. Safety valve kits from CookingHeatingRelacements fit round stand-up and pyramid heaters with M8x1 threads, ensuring drop-in replacement. Always measure your burner head or reflector studs first; a mismatch leads to drilling hassles on-site.
| Part Type | Key Fit Specs | Garden Use Tip |
|---|---|---|
| Reflector Shield | 33″ dia, 3 holes @ 6 7/8″ | Matches mushroom tops for max heat to seating areas |
| Hardware Kit | M6/M8 bolts, spacers | Reinforces on gravel patios |
| Safety Valve | M10x1 inlet, M8x1 pilot | Universal for propane towers |
Safety Features for Peace of Mind
Safety tops the list for Best Mushroom Heater Parts, especially with kids or pets roaming the garden. Thermocouple and tilt switch kits, like CookingHeatingRelacements or Threlaco sets, auto-shutoff on flame-out or tip-over, preventing gas leaks near plants. Brass valves with flat 4.8mm terminals sense hypoxia quickly, vital for enclosed patios.
EVIMOTAL and PAHQER kits include dump switches rated for 250VAC, compatible with fire pits too. For gardeners hosting barbecues, these features pair well with heaters that have auto-shutoff, as in our roundup of reliable outdoor heaters. Install tip: Position tilt switches low to catch ground-level bumps from wheelbarrows.
Ease of Installation
Opt for Best Mushroom Heater Parts with included hardware and no-drill claims. Kisworm shields assemble tool-free after peeling protective film, joining panels with screws. Bolt sets from Firdnyohs come with wrenches and wing nuts for solo installs, perfect for weekend warriors maintaining garden gear.
Burner assemblies like GARDENSUN use existing screws for quick swaps, restoring flame without mods. Wheel kits snap on with bolts, adding mobility to shift heaters from lawn to deck. Pro gardener advice: Work in dry conditions and torque nuts evenly to avoid stripping in rusty bases.
Value and Longevity
Balance cost with lifespan in Best Mushroom Heater Parts; emitter screens or screens last longer than plastic alternatives. Durable Kisworm domes save propane versus new heaters, while generic wheel kits enhance resale value. Safety kits under $8.91 offer big returns by averting hazards.
For budget gardeners, hardware kits reinforce without full rebuilds. Link to affordable full heaters if parts exceed needs, but replacements often prove cheaper. Check warranties; OEM like Garden Sun back longevity claims.
Mobility and Accessories
Add wheels for easy repositioning around large lawns. Universal kits with stainless brackets fit round bases, gliding over grass or paths. Pair with heaters designed for mobility for versatile garden use.
These extras prevent dragging damage to turf, keeping your space pristine. Install on level ground first to ensure even load.
Why You Should Trust Us
At New York Garden, we specialize in practical reviews for patio, lawn, and garden products, drawing from extensive analysis of specs, user patterns, and manufacturer data. Our team focuses on U.S. homeowner needs, like weather-resistant gear for variable climates, ensuring Best Mushroom Heater Parts recommendations suit real backyard scenarios without hype.
We transparently evaluate fit, durability, and value across 10 options from Kisworm, Firdnyohs, CookingHeatingRelacements and more and others, cross-referencing compatibility for popular models. Visit our outdoor heating category for more tailored advice, backed by honest insights for gardeners like you.
Final Thoughts
After reviewing these Best Mushroom Heater Parts, our best overall pick is the Kisworm Patio Heater Reflector Shield. Its aluminum construction, 33-inch dome, and easy assembly make it ideal for gardeners seeking efficient heat reflection to warm seating near garden plots, protecting against weather while conserving fuel.
For best value, go with the CookingHeatingRelacements Outdoor Heater Replacement Parts Thermocouple & Tilt Switch. This safety kit fits most stand-up propane heaters, offering quick flame-out protection at a fraction of full repair costs, perfect for budget-conscious maintenance during garden extensions.
Best for mobility in larger yards is the Universal Patio Heater Wheel Kit. Stainless brackets and smooth wheels let you reposition effortlessly, avoiding turf wear and suiting dynamic outdoor living. All picks align with durable, gardener-focused needs; explore our outdoor heaters section for complete systems.
FAQs
What are the most common Best Mushroom Heater Parts gardeners need?
Reflector shields, hardware bolt kits, and safety thermocouples top the list for mushroom heaters. These address wear from exposure, loosening, and flame issues, keeping your patio warm reliably in 2026.
How do I know if a part fits my mushroom heater?
Measure hole spacing, diameter, and thread sizes like M8x1 for valves. Universal claims cover most, but check model numbers like NCZH for exact matches, avoiding install headaches.
Are safety switches necessary for Best Mushroom Heater Parts?
Yes, tilt and thermocouple switches prevent leaks on tip-over or flame-out, crucial near gardens. Kits from Threlaco or EVIMOTAL integrate easily for safer operation.
Can I install Best Mushroom Heater Parts myself?
Most are DIY-friendly with included tools and instructions. Shields and wheels take under 30 minutes; follow removal of old parts precisely for secure fits.
Where can I find more patio heating advice?
Our Outdoor Heater Replacement Parts category has guides, plus related reviews on heaters with features like wheels or auto-shutoff for comprehensive garden setups in 2026.


Write Your Review
No reviews yet. Be the first to share your experience!