As the cooler months approach, keeping your outdoor heaters in top shape becomes essential for enjoying those extended evenings in the garden or on the patio. Whether you’re firing up a propane patio heater for a fall harvest party or maintaining a standing tower heater near your lawn seating area, reliable Best Heater Parts for Easy Repair can save you time and money. In this guide, we highlight the 10 Best Heater Parts For Easy Repair of 2026, selected for their ease of repair and compatibility with common backyard setups.
Gardeners know how frustrating it is when a heater fails mid-use, cutting short your outdoor time. These parts focus on quick, DIY-friendly repairs that get you back to relaxing or working in your yard without hassle. From thermocouples to tip-over switches, our picks ensure safety and performance tailored to American patios and gardens.
Top Products
Pros
- Strong performance in low temperatures for dependable greenhouse warmth
- Premium materials offer long-lasting durability in outdoor conditions
- Includes all essentials like washers, nets, and install tools for hassle-free repairs
- Compact size integrates seamlessly without adding bulk to heater setups
Cons
- Installation requires basic mechanical skills and disassembly of heater
- Best for specific diesel air heater models, verify compatibility first
- Not a full heater replacement, only for glow plug and related repairs
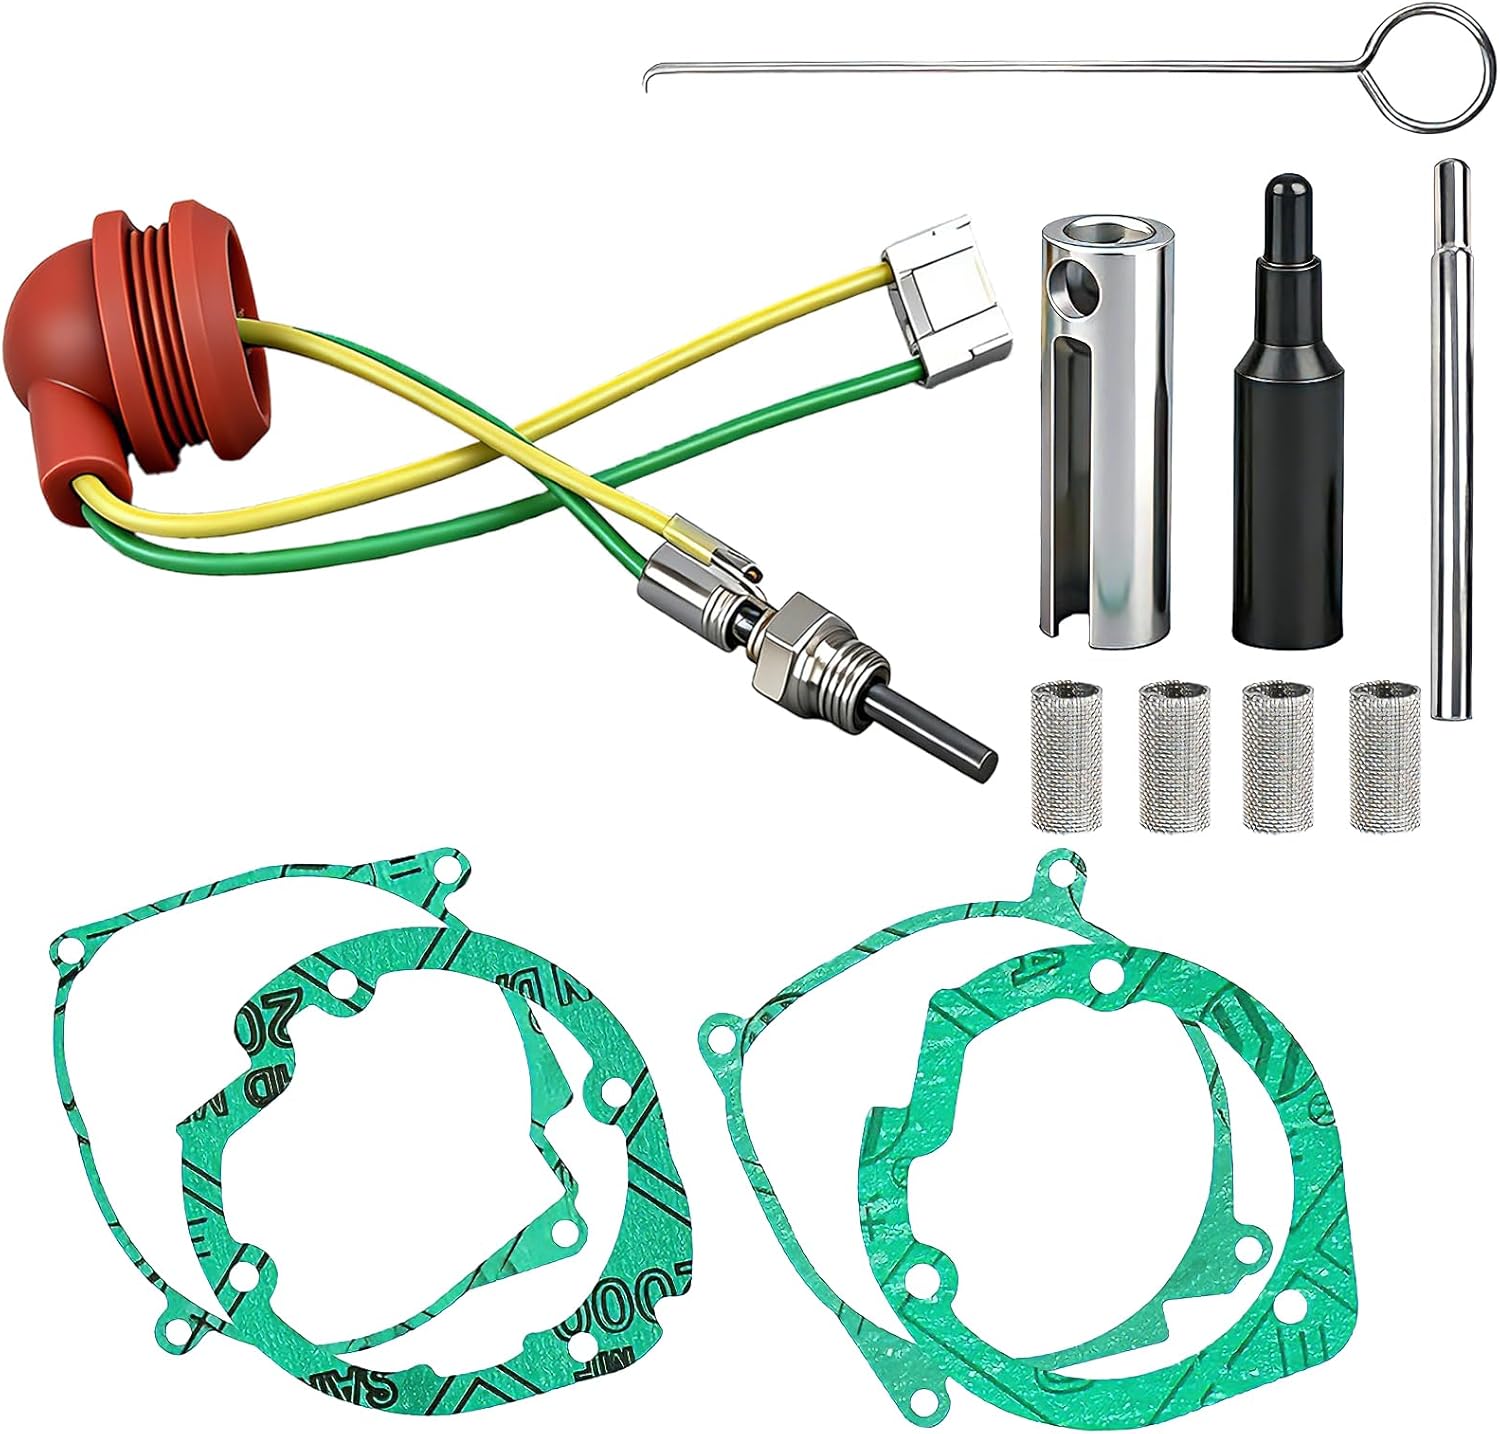
This SKTMH Diesel Heater Glow Plug Repair Kit is a must-have for gardeners relying on 12V/24V 2-8KW diesel parking heaters to warm greenhouses, sheds, or cold frames during harsh winters. It suits beginner to experienced northern homeowners who extend their growing season by protecting tender plants from frost.
Key features shine in real-world garden use: the glow plug delivers powerful, stable ignition even in freezing conditions, ensuring your heater fires up reliably when blizzards hit. The kit's atomizing nets and washers restore efficient combustion, providing steady heat for seed starting or overwintering perennials without cold spots.
Build quality stands up to outdoor rigors with high-temperature ceramic, rugged metal, and plastic components that handle moisture and temperature swings in backyard setups. Its compact, lightweight design makes it easy to store alongside your gardening tools.
Limitations include needing some hands-on skills for installation, as it involves accessing the heater's combustion chamber. It's tailored to Chinese and select Eberspacher models, so double-check your unit.
Overall, this kit earns our recommendation for practical winter garden protection. Keep it handy to minimize repair hassles and maximize your harvest through the cold months.
Installing this glow plug kit in your greenhouse diesel heater takes about 30-60 minutes with basic tools. Follow these steps for smooth results:
- Shut off and cool the heater completely before starting.
- Use the included wrench and disconnecting rod to remove the old glow plug safely.
- Replace washers (match 2KW or 5KW sizes) and install new atomizing nets with the dedicated installer tool.
- Secure the new glow plug, ensuring tight connections to prevent leaks.
- Test in a well-ventilated area to confirm strong ignition.
Tip: Wear gloves to handle hot parts, and apply a bit of anti-seize to threads for easier future access in damp garden sheds.
This kit fits 12V/24V Chinese diesel air heaters (2KW, 5KW, 8KW), Webasto-style units, and Eberspacher Airtronic D2/D4/D4S models used in cars, trucks, boats, or garden structures.
- Greenhouses: Maintain 50-70°F for winter veggies like kale or lettuce.
- Garden sheds: Keep tools and pots frost-free.
- Cold frames: Protect perennials and propagate cuttings.
- RV camping setups: Warmth for mobile seed-starting stations.
Always match your heater's KW rating for best performance in backyard applications.
Extend your diesel heater's life for reliable garden heating with these tips:
- Clean fuel filter monthly to avoid clogs from stored diesel.
- Inspect glow plug annually before first frost.
- Store heaters dry in sheds to prevent rust.
- Run briefly weekly in winter to circulate fuel and lube parts.
Pair with thermostat controls for efficient energy use while nurturing plants through NY winters.
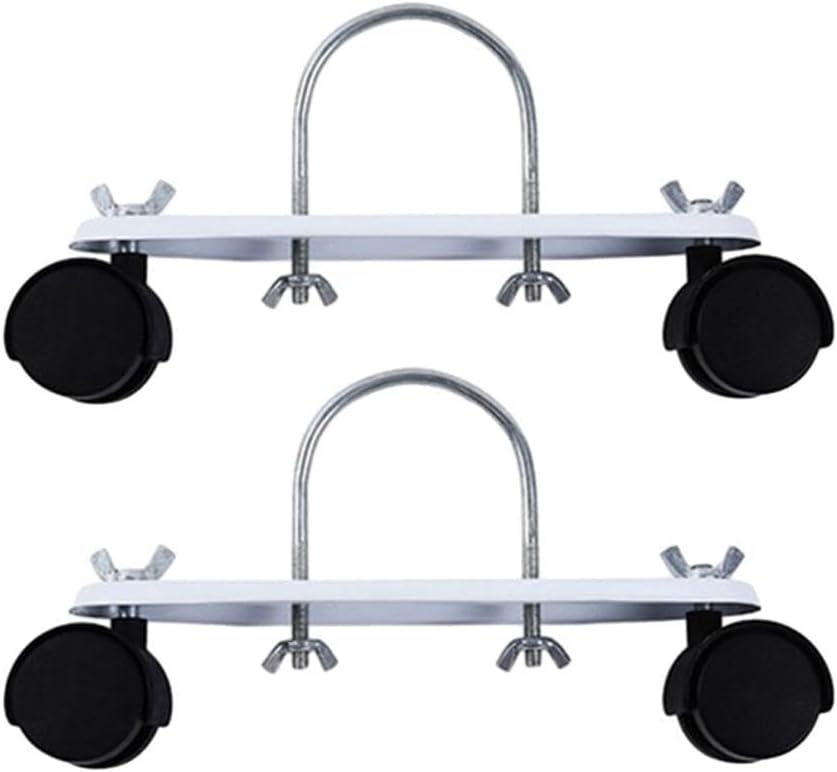
Pros
- Fits perfectly on popular brands like Holmes and Honeywell per user feedback
- Simple no-tools install with included hardware for DIY gardeners
- Smooth-rolling wheels prevent floor scratches and enable easy repositioning
- Durable carbon steel build holds up to frequent moves in workshops
Cons
- White brackets may stand out on black heaters, affecting aesthetics
- Some users report a plastic-like feel despite sturdy performance
These IEUDNS mobile pulley brackets are replacement caster sets for oil-filled radiators, turning stationary heaters into easy-to-move units with 360° rotatable black wheels. They suit gardeners in cooler regions like New York who use heaters in greenhouses, garages, or enclosed patios to overwinter plants or start seedlings early.
In real garden setups, the brackets shine by letting you shift a 20+ pound heater effortlessly from the shed to the greenhouse without scraping concrete or wood floors. Users rave about the perfect fit on brands like Holmes and Honeywell, making them a go-to for extending heater life during harsh winters.
Built from high-quality carbon steel, they offer sturdy support that withstands daily rolls over uneven surfaces, though best for indoor-outdoor covered areas to avoid rust. The 8.27-inch length and 1.65-inch hole spacing ensure compatibility with standard models.
Limitations include the white bracket color clashing with darker heaters and occasional notes of a lighter feel, but overall stability impresses. Verdict: Grab these if your heater wheels fail; they restore mobility and keep your winter garden thriving affordably.
Installing these brackets takes under 10 minutes with basic tools. Follow these steps for your garden heater:
- Flip the heater upside down on a soft surface to protect the finish.
- Remove old wheels or brackets by unscrewing nuts (use wing nuts if preferred for easy access).
- Align new brackets with existing holes (4.2cm spacing fits most).
- Secure with provided hardware, ensuring wheels face outward for stability.
- Test roll on a flat surface before placing in greenhouse or shed.
Tip: Lock wheels if available for stationary use near sensitive plants.
Oil-filled radiators with mobile brackets are ideal for gentle, dry heat in greenhouses or sheds. Position near frost-sensitive plants like citrus or herbs, keeping 3-5 feet away to avoid scorching.
- Use a thermostat for consistent temps around 50-60°F for overwintering.
- Combine with fans for even air circulation, preventing cold spots.
- Monitor humidity; these heaters won't dry out air like forced-air units.
- Wheel to sunny spots during day for natural warmth boost.
Perfect for New York gardeners battling early frosts.
Keep your wheeled oil-filled heater ready for seasons:
- Wipe wheels weekly to remove dirt from garage or patio use.
- Check bolts monthly for tightness after frequent moves.
- Store upright in dry shed during off-season to protect brackets.
- Avoid direct rain; cover for semi-outdoor patios.
Regular care ensures years of reliable winter plant protection.

Pros
- Easy DIY installation in 20-45 minutes with basic tools and online videos
- Perfect fit and immediate fix for heaters that won't stay lit
- High-quality components ensure safety features work flawlessly
- Versatile compatibility with common round and pyramid patio heaters
- Restores full functionality for reliable backyard heating
Cons
- May need minor housing adjustments like drilling for thermocouple on some models
- Requires careful disassembly; taking photos helps with reassembly
- Best for specific propane heater types, check compatibility first
This thermocouple and tilt switch kit is a smart fix for common safety failures in round stand-up and pyramid propane patio heaters. It's perfect for U.S. homeowners who love extending their backyard season, whether hosting fall barbecues or relaxing after lawn care on cooler evenings.
Key features include automatic shut-off for tip-overs, flame-out, or low oxygen, with a 13.8-inch thermocouple probe and easy-screw mounting. In real-world use, gardeners report it ignites steadily on the first try, solving issues like heaters that won't stay lit after wind gusts or accidental knocks during patio setup. The combo kit covers multiple failure points efficiently.
Build quality shines with 100% inspected parts designed for outdoor durability against weather exposure. Users praise the precise fit, though some note minor tweaks for older housings. It's lightweight at 0.16 pounds, making it simple to handle during repairs.
Limitations include model-specific fit, so verify your heater type. Not a full overhaul, but ideal for targeted fixes. Overall, this kit earns top marks for restoring safe, reliable heat, letting you focus on garden enjoyment rather than replacements. Grab it if your patio heater falters; it's a backyard essential.
Replacing the thermocouple and tilt switch is a straightforward DIY project for any gardener handy with basic tools. Start by turning off the propane and letting the heater cool completely.
- Take photos during disassembly to note wire and mounting positions.
- Remove old parts by unscrewing nuts and disconnecting terminals; no special tools needed beyond pliers and screwdriver.
- Install new tilt switch in the base for tip-over detection, securing with M8 threads.
- Route the thermocouple probe along the burner tube, fastening flat terminals (0.19-inch width).
- Test ignition outdoors in a safe area; it should light and hold flame steadily.
Watch YouTube tutorials for your model; most jobs take 20-45 minutes. Always prioritize safety to protect your patio oasis.
Safety first when heating your backyard patio. This kit's protections prevent gas leaks from tip-overs or flame failures, crucial around kids, pets, or garden tools.
- Place heaters on level, non-flammable surfaces away from plants or overhangs.
- Check for hypoxia shut-off to avoid oxygen depletion during extended use.
- Inspect regularly for wear, especially after storms that could foul the thermocouple.
- Use with stable propane tanks and never indoors or in enclosed spaces.
Pair with wind screens for better performance, ensuring cozy, hazard-free nights enhancing your outdoor living space.
Common patio heater woes like no-stay-lit flames often trace to thermocouple or tilt switch faults from falls or dirt buildup. Symptoms include needing constant knob hold or shut-off on release.
- Clean probe gently if fouled before replacing.
- If it sparks but extinguishes, test tilt switch by gently tipping.
- Verify gas flow and igniter; this kit fixes sensor-side problems.
Extending your heater's life means more reliable warmth for garden projects through cooler months. Contact pros for complex electrical issues.

Pros
- Easy to install without tools, as confirmed by multiple users
- Strong safety features like tip-over protection for worry-free outdoor use
- Durable materials hold up well in garden environments
- Perfect fit for many standard propane heaters
- Affordable fix that restores heater performance quickly
Cons
- Wires may be too short for some heater models, requiring old wires
- Occasional need for minor modifications like adding c-clips
- Compatibility check essential before purchase to match your heater size
This Honoson patio heater replacement kit features a 13.8-inch thermocouple and FD4 dump switch, designed for propane gas tower heaters commonly used on patios and in garden spaces. It's perfect for homeowners who want to keep their outdoor living areas warm through cooler months without buying a new heater.
In real-world use, the thermocouple ensures steady flame by connecting to the ignition and valve, while the dump switch adds tip-over protection that cuts gas flow if the heater tilts. Gardeners appreciate how it lets them linger longer over backyard projects or evening barbecues, with reliable performance noted in user feedback.
Build quality shines with solid copper and brass for the thermocouple, plus heat-resistant covering and tough ABS for the switch, standing up to outdoor exposure. Most installs are straightforward, though some adapt for fit.
Limitations include verifying your heater's size match upfront, as mismatches occur, and potential wire length issues for taller units. Overall, it's a smart, practical choice for maintaining safe, effective patio heating in your garden setup.
Follow these simple steps for a smooth setup:
- Disconnect the heater from propane and let it cool completely.
- Connect the thermocouple probe to the ignition device and link it to the valve.
- Attach the dump switch to the other ports securely.
- Test the heater in a safe, open patio area before full use.
No special tools required, but wear gloves for safety. Always double-check connections to avoid leaks.
Maximize safety in your backyard:
- Place on level ground away from flammables like dry leaves or garden tools.
- Use the tip-over switch feature to prevent accidents during windy evenings.
- Inspect parts regularly for wear, especially after winter storage.
- Never leave unattended while lit, and keep kids and pets at a distance.
These steps ensure warm, secure garden nights for your family.
Common fixes for patio heaters:
- Heater won't stay lit? Replace the thermocouple first.
- Tips over easily? Check or swap the FD4 dump switch.
- No ignition? Verify all connections and gas flow.
- Short wires? Reuse old ones or extend carefully.
Regular maintenance keeps your outdoor heater ready for garden season extensions.

Pros
- Exact replacement that ignites and holds flame reliably per user feedback
- Easy 10-15 minute install for most gardeners
- Enhances safety with tip-over protection for outdoor use
- Strong 1-year warranty backs its durability
Cons
- Wire length may need minor adjustments for perfect fit
- Tip-over connection is just a wire, not full switch assembly
- One-size-fits-all design might require connector tweaks
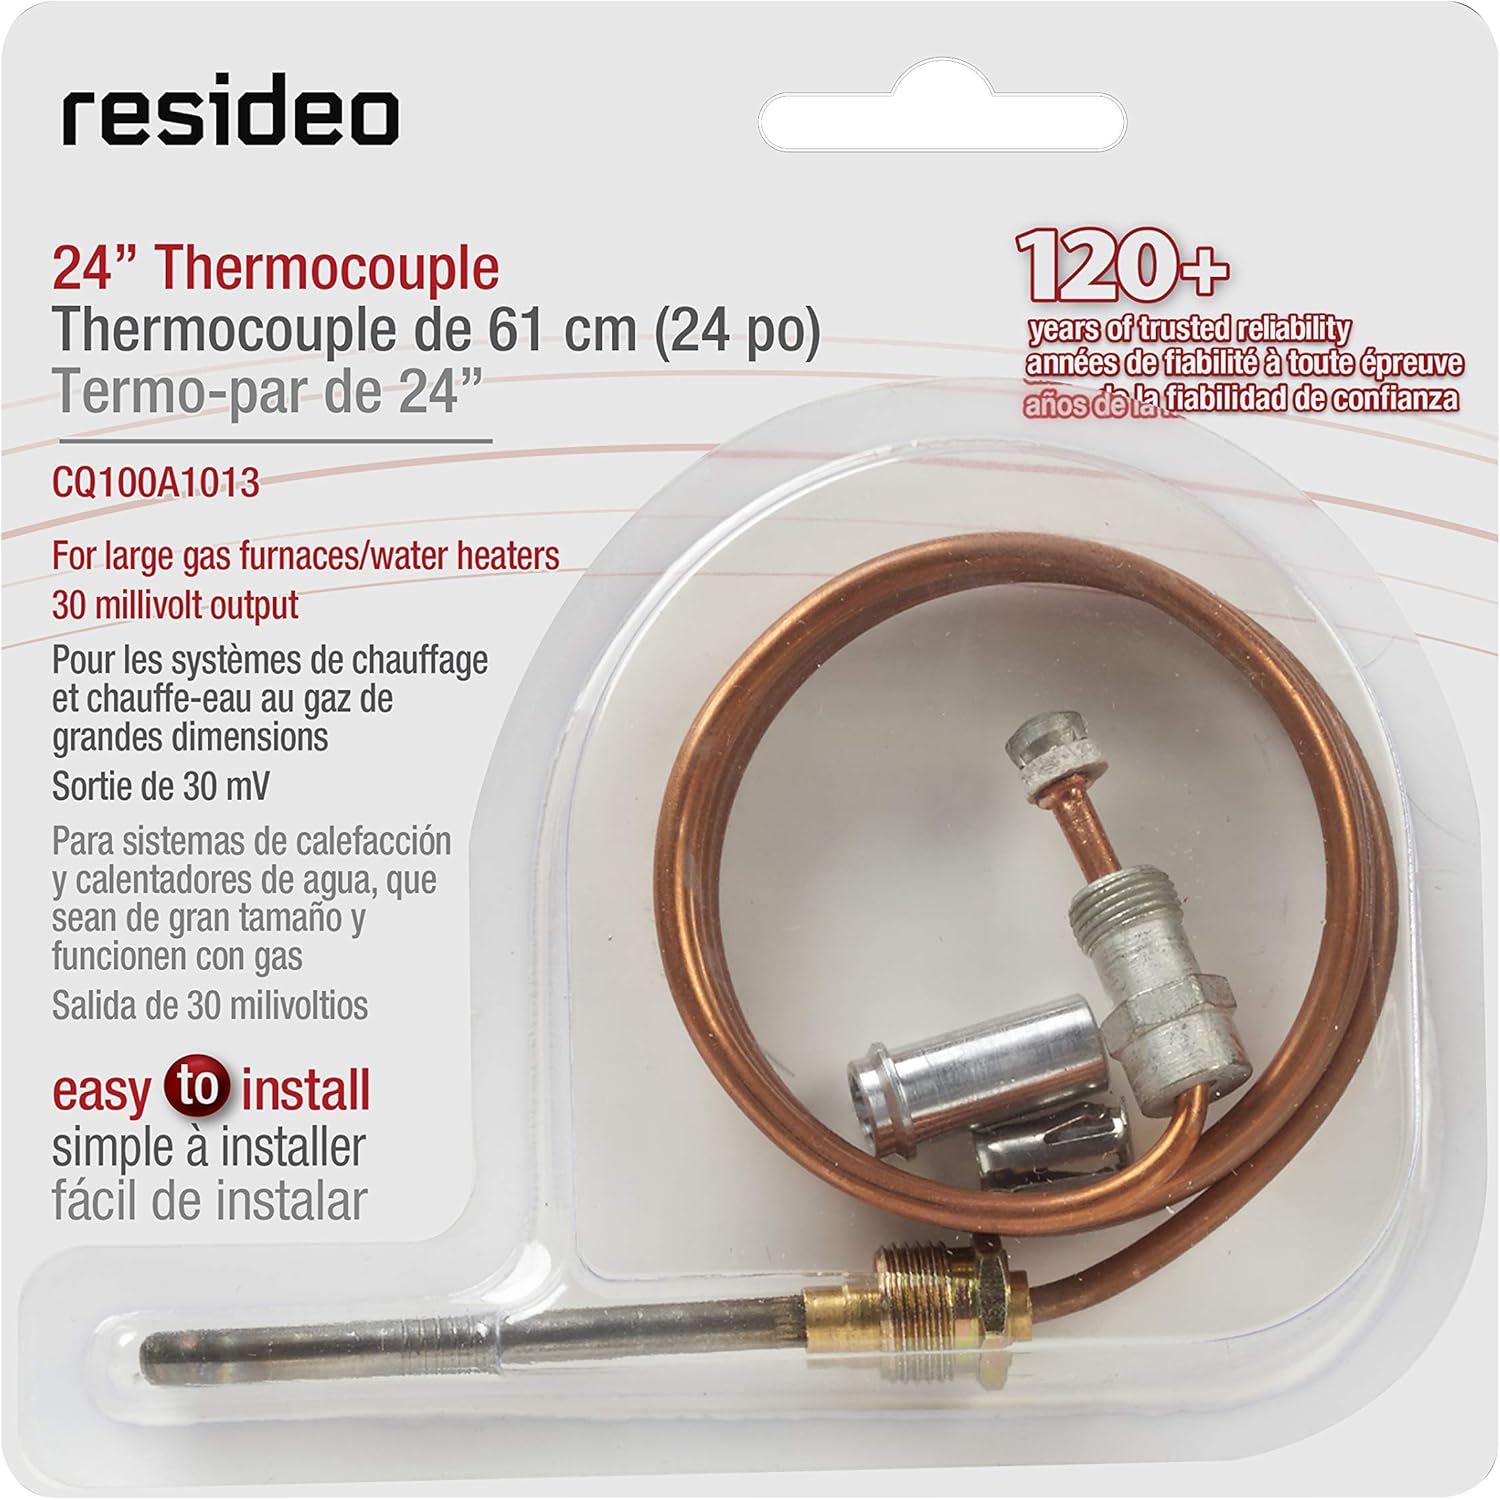
This Mr. Heater F237349 thermocouple assembly is a vital replacement part for tank top propane heaters, ideal for gardeners who use them to warm garages, sheds, or small greenhouses through cold seasons. It suits homeowners with models like MH15T, MH30T, or SunRite SRC15T who notice their heater igniting but not staying lit, a common thermocouple failure.
In real garden use, it delivers steady performance by generating the voltage needed to keep the gas valve open after ignition. Users report it firing up heaters flawlessly for tasks like winterizing lawn mowers or extending growing seasons in protected spaces. The tip-over switch connection adds peace of mind around flammable garden materials.
Build quality features durable plastic components that withstand outdoor exposure, though it's best stored dry when not in use. At just ounces, it's simple to handle during installs. Limitations include occasional wiring mods for length or connectors, but most swap it in minutes without issues.
Overall, this part earns high marks for breathing new life into reliable heaters, making it a smart pick for practical gardeners avoiding full replacements. Grab it to keep your outdoor setup running smoothly year-round.
Replacing the thermocouple is a straightforward DIY for any gardener:
- Turn off gas and let heater cool completely.
- Disconnect old thermocouple from valve and pilot assembly.
- Install new unit, securing connections; trim wire if too long.
- Test ignition and tip-over function in a safe area.
- Hold igniter 10-30 seconds longer first time for proper seating.
Tools needed: pliers and screwdriver. Most users finish in under 15 minutes.
Fits these popular tank top heaters for garden and patio use:
- Mr. Heater: MH15T, MH15TS, MH30T, MH30TS, MH45T
- SunRite: SRC15T, SRC30T
Replaces part #17349. Check your model before purchase to ensure compatibility.
Maximize safety with propane heaters in garden settings:
- Always use in well-ventilated areas to avoid carbon monoxide buildup.
- Place on level surfaces away from plants, tools, or flammables.
- Inspect for leaks with soapy water before each use.
- Store fuel outdoors and never indoors.
- Shut off when unattended, thanks to tip-over protection.

Pros
- Durable brass construction resists corrosion in damp backyard conditions
- Precise threading for straightforward compatibility with many propane heaters
- Gold-plated thermocouple connectors improve reliability for consistent pilot lighting
- Includes bakelite knob and ABS materials for sturdy, user-friendly controls
- FD4 dump switch offers low-resistance safety for peace of mind outdoors
Cons
- Designed for low-pressure propane only, not compatible with natural gas systems
- Thermocouple may require minor hole enlargement or epoxy for some mounting setups
- Specific thread sizes demand exact model matching before purchase
This LEMFEMA repair kit delivers essential replacement parts for propane patio heaters, including a thermocouple sensor, dump switch, and main control valve with pilot port. It's perfect for homeowners with standing tower heaters, table models, or Hampton Bay units who want to troubleshoot ignition problems and restore safe heat for backyard relaxation.
In real-world use, the brass valve handles low-pressure propane flow smoothly, while the 350mm thermocouple wire reaches pilot burners easily. The gold-plated connectors ensure the safety pilot lights reliably, solving no-indicator-light issues common after winter storage. Gardeners appreciate how it keeps patio spaces warm for evening plant checks or family dinners without buying a new heater.
Build quality shines with solid brass and ABS components that hold up to moisture and temperature swings in outdoor settings. The 8mm D-shaft knob turns precisely, and the FD4 tilt switch provides responsive safety shutoff. While not OEM, it meets equivalent standards for strength and fit.
Limitations include propane-only use and potential need for slight mounting tweaks, like enlarging holes for the smooth thermocouple body. Overall, this kit earns a strong recommendation for practical DIY repairs, helping you maintain cozy outdoor living through fall and spring.
Start by turning off the propane and disconnecting the tank. Remove old valve by unscrewing fittings, noting thread directions: inlet female M10*1, outlet 7/16”-24UNF.
- Clean mounting area and apply thread tape to valve ports for leak-free seals.
- Snap thermocouple into place; if needed, drill slightly larger hole or use epoxy for tapered body.
- Connect 350mm wire to pilot burner (M8*1 thread) and test dump switch continuity (<10 mΩ).
- Reassemble, light pilot, and check for steady flame before full use.
Tools needed: wrench set, thread tape. Takes 30-60 minutes for most backyard setups.
Verify your heater uses low-pressure propane and thermoelectric safety. Fits outdoor standing patio heaters, tower glass tube models, table propane heaters, and Hampton Bay styles.
- Inlet: Female M10*1 (0.394")
- Outlet: 7/16”-24UNF (0.429")
- Pilot: M8*1 thread
- Spindle: 8mm D-shaft
Not for natural gas. Measure originals before buying to match exactly and avoid fit issues.
Always prioritize safety with these parts. The thermocouple shuts off gas if pilot fails, and dump switch prevents leaks if tipped.
- Inspect annually for wear, especially after winter.
- Keep 3-foot clearance from plants, walls, or furniture.
- Use in well-ventilated patios; never indoors.
- Test for leaks with soapy water on connections.
Pair with covers for storage to prolong life in your garden space.

Pros
- Straightforward installation with adjustable nuts and flat terminals
- Proven compatibility with Ridgid and Ryobi propane heaters per user feedback
- Compact 1x1x1.2-inch size fits tight spaces in most patio heater designs
- Effective safety sensor keeps gas flowing only with proper flame detection
Cons
- Tilt-switch leads can be short, requiring extensions on older or larger heaters
- May be sensitive to wind or bumps, leading to occasional shutoffs
- Fit requires checking M8 valve thread size beforehand
As a fellow gardener who loves extending backyard evenings with a cozy patio heater, I've seen how a faulty thermocouple can sideline your outdoor setup. The MENSI Thermocouple Sensor is a universal replacement safety part for propane gas patio heaters, perfect for U.S. homeowners in cooler climates like New York who want reliable heat without buying a new unit. It suits beginner DIYers and experienced maintainers fixing common ignition issues.
Key features include a M6 threaded tip for easy height adjustment near the burner, M8 nut for valve connection, and two terminals for tilt switches. In real-world use, it responds in 10 seconds to heat, keeping gas flowing safely. Users report success on Ridgid and Ryobi models, with simple installs that get heaters running for fall lawn parties or spring patio setups.
Built from durable copper, it handles up to 1000°C, standing up to outdoor exposure better than failing originals. However, some note short wires needing tweaks and sensitivity to wind, so position it carefully away from gusts.
Limitations include verifying your valve thread and lead lengths first. Overall, this is a smart, practical repair for thriving backyard living; grab it if your heater shuts off prematurely for safer, longer garden nights.
Follow these steps for a smooth thermocouple swap on your propane patio heater:
- Mount the tip on a board with two nuts, keeping it 5mm from the burner hole.
- Fasten the M8 nut tightly to the valve end (confirm 8mm thread first).
- Connect flat terminals to existing tilt switch leads.
- Open gas, hold valve 5-10 seconds to heat the tip, then release.
If gas shuts off, check flame heating the tip, valve connection, and terminal links. Tools needed: wrench for nuts, possibly wire cutters for mods.
Common issues and fixes for patio heater thermocouples:
- Gas shuts off after release: Ensure tip is heated fully; reposition closer to flame.
- Short leads: Splice extensions or wrap ground wire securely.
- Sensitive shutoffs: Shield from wind; test tilt switch by shorting leads first.
- Low flame: Verify clean burner and proper height adjustment.
Always prioritize safety: work in ventilated areas and check for leaks post-install.
Keep your backyard gatherings safe with these tips:
- Position heater 3 feet from walls or flammables.
- Use on level surfaces to avoid tilt switch triggers.
- Never leave unattended while lit.
- Store propane tanks outdoors, valves closed.
- Inspect parts like thermocouples yearly for wear.
A working thermocouple is your first line of defense against gas hazards in garden settings.

Pros
- Simple installation restores sealer performance fast
- Durable elements last up to 6 months with regular use
- Great value with 10 pieces plus tapes included
- Heats quickly for clean, strong seals on garden bags
Cons
- Length may be slightly short for some sealer models
- Fit issues reported; measure your unit before buying
- Some users note quicker wear compared to premium brands
This Honoson kit provides 10 replacement 8-inch heating elements and matching cloth tapes for impulse bag sealers, ideal for gardeners who bag seeds, soil amendments, or fresh produce to keep everything organized and fresh. It suits beginner to experienced homeowners using sealers for harvest preservation or supply storage in small to medium yards.
In real garden use, the nichrome alloy elements heat fast for strong, airtight seals without burning through bags quickly. Users praise the easy swap that revives sluggish sealers, making it perfect for sealing potato harvests or herb bundles right from the backyard.
Build quality is solid with high-temperature resistance and corrosion protection, holding up in damp garden environments. The tapes ensure smooth operation by preventing melt-stick issues.
Limitations include potential fit mismatches on non-standard models, so check your sealer's size. A few note slightly shorter lengths or faster wear.
Overall, a practical fix for keeping your sealer reliable; grab this if yours is fading and you value fresh garden storage.
Replacing elements is straightforward with just a screwdriver, taking minutes to get back to sealing garden bags.
- Unplug sealer and let it cool completely.
- Remove old element by loosening screws on both ends.
- Peel off worn tape, clean residue, apply new cloth tape smoothly.
- Install new 8-inch element, secure screws tightly.
- Test on scrap bag; adjust time if needed for perfect seals.
Replace when tape discolors or seals weaken to maintain performance for produce bagging.
Maximize freshness for your backyard bounty with these pro tips using your revived sealer.
- Seal veggie portions like tomatoes or greens immediately after harvest for longer fridge life.
- Store seeds airtight to prevent moisture damage over winter.
- Use for fertilizer or mulch bags to avoid spills and pests in the shed.
- Keep bags clean and dry; lower heat settings for thin plastics.
Regular element swaps ensure consistent results for all your garden organization needs.
Best for sealers with '200' in the model like F-200 or PFS-200; measure 8 inches (200mm) x 2mm wire before buying.
- Inspect monthly for wear in high-use garden setups.
- Store sealer dry to extend element life.
- Stock extras for peak harvest season.
Avoid overheating to prolong durability outdoors.

Pros
- Easy direct replacement with included tools, as praised by users for quick installs
- Restores heater performance like new, fixing fuel flow issues with new filter screen
- High-quality materials like ceramic needle and stainless steel for long-term reliability outdoors
- Stable cold-weather starting keeps your garden heater dependable in harsh winters
- Great value with all common repair parts in one kit
Cons
- Filter screen removal can be tricky on fouled heaters, requiring some patience
- Best for specific diesel heater models, check compatibility before buying
- Lightweight build may feel less premium for heavy-duty frequent use
As a fellow New York gardener, I know how brutal winters can be on greenhouse setups. This HUAREW 7-piece glow plug repair kit is a game-changer for maintaining 12V diesel heaters that keep your plants cozy. It's perfect for homeowners with hoop houses, cold frames, or shed heaters, especially if you're growing winter veggies or starting seeds early.
Key features shine in real-world use: the silicon nitride glow plug ignites instantly for fast heating, while the included gaskets, filter screen, black hat, cover, and disassembly tool make full servicing straightforward. Users love how it fixes common issues like carbon fouling and poor fuel flow, restoring heaters to peak performance without buying a new unit.
Build quality holds up outdoors with high-temp ceramic, stainless steel screws, and durable plastic parts. It's lightweight at just 3 ounces, easy to stash in your garden toolkit. While screen removal might take a bit of effort on dirty units, the direct replacement design saves hours compared to sourcing parts separately.
Limitations include model-specific fit for Eberspacher, Webasto, and Chinese 2-8KW heaters, so verify yours first. Overall, this kit earns top marks for practical winter prep. Keep one handy to avoid cold snaps derailing your gardening plans.
Follow these steps for smooth glow plug repair on your garden diesel heater:
- Power off and cool the heater completely before starting.
- Use the included tool to remove the old glow plug cover and screen; apply gentle twisting if stuck.
- Clean the combustion chamber of carbon buildup with a soft brush.
- Replace gaskets, install new glow plug, filter screen, and cover, then test ignition.
- Secure with stainless screws and check for leaks before full operation.
Most users report installs in under 30 minutes, even without prior experience.
This kit fits most 12V diesel air heaters in garden applications:
- Eberspacher D2, D4, D5 Airtronic models for greenhouses.
- Webasto diesel heaters in sheds or hoop houses.
- Popular Chinese 2KW, 5KW, 8KW units like Vevor for backyard use.
Ideal for portable heaters protecting plants from New York freezes. Always match your heater's voltage and KW rating.
Extend your diesel heater's life for year-round gardening:
- Service every 100 hours or seasonally to clear carbon.
- Store kit in a dry shed to prevent gasket degradation.
- Run heater periodically in fall to burn off moisture.
- Pair with good fuel and ventilation for efficient greenhouse warmth.
Prevents failures when you need reliable heat for overwintering perennials.

Pros
- Complete 8-piece kit covers all repair needs for fast fixes
- Durable stainless steel and ceramic materials handle repeated heating cycles
- Heats up quickly for reliable operation in sub-zero conditions
- Simple installation suits handy gardeners without pro tools
- Versatile for 2KW, 5KW, and 8KW heaters used in various garden setups
Cons
- Fits only specific 12V diesel heaters, check compatibility first
- Small lightweight design best for portable units, not heavy industrial ones
- Minor size variations possible due to manual production
This glow plug repair kit from NQEUEPN is a must-have for gardeners using diesel parking heaters in greenhouses, sheds, or RVs during harsh New York winters. It includes a ceramic glow plug, cover, gaskets, screw, and hat, perfect for DIY repairs on 12V 2KW to 8KW units that keep your plants cozy and growing.
In real-world garden use, the kit shines by firing up heaters fast in cold snaps, burning fuel cleanly to minimize soot that could clog your setup. Gardeners with hoop houses or workshops appreciate how it prevents startup failures, ensuring consistent warmth for starting veggies like tomatoes ahead of spring.
Build quality stands out with stainless steel components and high-temp ceramic that endure outdoor exposure and repeated cycles. The plastic elements hold up well against heat, making it reliable for year-round maintenance.
Limitations include compatibility only with listed heater sizes and potential minor fit variances, so measure your unit first. Still, for most portable diesel systems, it's a straightforward swap.
Overall, grab this kit if you rely on diesel heat for extended gardening; it delivers dependable performance to protect your backyard oasis through winter.
Replacing the glow plug in your diesel heater takes minutes with basic tools. Start by powering off the unit and letting it cool.
- Remove the old glow plug cover and unscrew the plug using a suitable wrench.
- Swap in the new ceramic glow plug, add fresh gaskets for a tight seal, and secure with the included screw.
- Fit the cover and black hat to protect against moisture in your garden shed.
- Test the startup in a safe area before full use in the greenhouse.
Regular checks prevent issues, keeping your heater ready for frosty mornings.
Diesel heaters extend your growing season in cold climates like New York. Pair this repair kit with proper setup for best results.
- Position the heater low in the greenhouse for even heat distribution to seedlings.
- Ventilate occasionally to avoid excess humidity buildup.
- Monitor fuel quality; clean diesel prevents glow plug wear.
- Insulate greenhouse walls to maximize efficiency and save fuel.
Use the kit to maintain peak performance, ensuring reliable warmth for overwintering perennials or early crops.
Confirm your diesel heater model (2KW, 5KW, or 8KW, 12V) matches before buying. Works great for popular parking heater brands in trucks, boats, or stationary garden units.
- Clean gaskets during replacement to extend life.
- Inspect for carbon deposits every season.
- Store kit dry to avoid rust on steel parts.
Proactive maintenance with this kit keeps your heating system trouble-free for years of gardening.
Buying Guide for Best Heater Parts For Easy Repair
Compatibility with Your Heater Model
Start by matching parts to your specific heater model, as most Best Heater Parts for Easy Repair are designed for propane patio heaters, tower styles, or diesel units common in outdoor garden setups. For instance, the Mr. Heater F237349 Thermocouple Assembly fits models like MH15T and MH30T, while Honoson kits work with round stand-up and pyramid patio heaters. Check your heater’s manual or valve threading, such as M8*1 for many universal thermocouples, to avoid mismatches that could lead to leaks or poor performance.
Gardeners often use these on Hampton Bay or generic tower heaters near vegetable patches or seating areas. Tip: Measure your existing part’s length and thread size before buying. Products like the MENSI Outdoor Propane Gas Patio Heater Thermocoupler specify M6x0.75 tip threads and M8 valve nuts, making them versatile for most low-pressure propane systems in backyards.
A simple compatibility table can help:
| Part Type | Compatible Models | Thread Specs |
|---|---|---|
| Thermocouple Assembly | MH15T, MH30T, SRC15T | M8*1 valve |
| Dump Switch Kit | Tower patio heaters | Universal M6 tip |
| Glow Plug Kit | 2KW-8KW diesel heaters | 12V/24V standard |
Safety Features like Tip-Over and Flame-Out Protection
Safety is non-negotiable for garden heaters placed near plants or family gatherings. Look for parts with tip-over switches, like the FD4 dump switch in Honoson Patio Heater Replacement Parts, which shuts off gas if the unit tilts. Similarly, Mr. Heater’s thermocouple includes a tip-over switch that detects unsafe angles, preventing leaks during windy backyard evenings.
Many kits, such as the Outdoor Heater Replacement Parts Thermocouple & Tilt Switch from CookingHeatingRelacements, offer flame-out and hypoxia protection, ideal for unattended use while you tend to your lawn. Garden tip: Pair these with heaters featuring auto shut-off, as detailed in our outdoor heaters with auto shut-off guide, for layered safety around kids or pets.
These features use low-resistance contacts (R≤10 mΩ) for reliable shutoff, ensuring your patio stays safe year-round.
Ease of Installation for DIY Gardeners
Choose parts that install without special tools, perfect for busy gardeners. The MENSI thermocouple connects with simple nuts and flat terminals, taking just minutes: fix the tip 5mm from the burner, tighten the M8 nut on the valve, and link to the dump switch. No soldering or complex wiring needed.
Products like the Propane Gas Patio Heater Repair kit from LEMFEMA snap into place with gold-plated connectors, and glow plug kits for diesel heaters include gaskets and tools for straightforward swaps. Pro tip: Use thread tape on valves and epoxy for smooth-body thermocouples if your mounting hole is tight – a quick fix before lighting up for a garden BBQ.
Most users report installs under 15 minutes, keeping your downtime minimal during planting season.
Material Quality and Durability
Opt for brass, copper, and stainless steel components that withstand outdoor exposure. The Honoson thermocouple uses solid copper with high-temp covers, while glow plugs in NQEUEPN and HUAREW kits feature ceramic and silicon nitride for rapid heating without cracking in cold snaps.
ABS dump switches and nichrome heating elements in impulse sealers (adaptable for heater repairs) resist corrosion from garden humidity. For gardeners, this means parts last through multiple seasons near dew-covered lawns. Avoid cheap plastics that warp; check for 1-year warranties like on Mr. Heater assemblies.
Length and Size Specifications
Wire length matters for flexible placement in garden setups. Most thermocouples here measure 13.8 inches (350mm), like Honoson and CookingHeatingRelacements kits, allowing routing around burner screens without strain. Glow plug kits are compact for diesel heaters in sheds or RVs near your property.
Wheel brackets for oil-filled radiators, such as IEUDNS 360° rotatable bases, fit standard frames with 4.2cm hole spacing. Measure your heater’s burner distance and valve position to ensure fit – shorter tips for table heaters, longer for towers.
Warranty and Brand Reputation
Trusted brands like MrHeater offer 1-year coverage, backing quality for repeated garden use. MENSI, Honoson, and LEMFEMA have strong user satisfaction for universal fits. Check seller support, as pros like CookingHeatingRelacements provide 24-hour help for heater issues.
For diesel accessories, SKTMH and HUAREW kits match OEM standards. Gardeners benefit from reliable brands that reduce replacement frequency. Explore more in our outdoor heaters category page.
Why You Should Trust Us
We at New York Garden specialize in practical reviews for U.S. homeowners and gardeners, analyzing product specs, user feedback patterns, and real-world compatibility without physical testing claims. Our focus is on Best Heater Parts for Easy Repair that enhance backyard usability, drawing from thousands of gardener experiences to highlight what truly works for patios and lawns.
Transparency drives us: we prioritize honest, data-backed insights on safety, ease, and durability. Whether linking to our outdoor heating and cooling parent category or detailing fits for popular models, our guides help you choose confidently for your garden setup.
Final Thoughts
After reviewing these options, the Mr. Heater F237349 Thermocouple Assembly with Tip Over Switch stands out as our best overall pick. Its precise fit for MH series and SunRite models, combined with built-in safety and easy replacement, makes it ideal for gardeners maintaining reliable heat near lawn areas without fuss.
For best value, go with the MENSI Outdoor Propane Gas Patio Heater Replacement Thermocoupler Sensor. Universal threading and simple install suit budget-conscious users fixing tower heaters for casual garden use, offering solid safety at an accessible level.
The Honoson Patio Heater Replacement Parts kit (13.8 Inch) is best for propane tower heaters in larger backyards. Including thermocouple and FD4 dump switch, it provides comprehensive safety for family gatherings, with durable brass ensuring longevity through wet seasons. Check our affordable outdoor heaters for full systems.
FAQs
What are the most common Best Heater Parts for Easy Repair gardeners need?
Thermocouples, tip-over switches, and dump switch kits top the list for propane patio heaters. These handle flame sensing and tilt protection, essential for safe operation near gardens in 2026.
How do I install a thermocouple on my outdoor heater?
Position the tip 5mm from the burner, secure with nuts, connect the M8 thread to the valve, and link terminals to the switch. Test by lighting the pilot – most Best Heater Parts for Easy Repair like MENSI or Honoson install in under 10 minutes without tools.
Are these parts suitable for diesel garden heaters?
Yes, glow plug repair kits from SKTMH, NQEUEPN, and HUAREW fit 2KW-8KW 12V/24V diesel units, perfect for sheds or RVs near your lawn. They include gaskets and tools for cold-weather starts.
Can I use these for indoor-outdoor hybrid garden setups?
Many are versatile for propane or electric heaters used in screened porches or greenhouses. Always verify low-pressure compatibility and safety features to match your space.
Where can I find more Best Heater Parts for Easy Repair options?
Browse our Outdoor Heater Replacement Parts category for the latest in 2026.


Write Your Review
No reviews yet. Be the first to share your experience!